Create a vault
This page is the full vault-creation walkthrough: every step, what each one does, what to watch for, and how to recover BTC if something stalls. For a 5-minute version of the happy path, see Quickstart.
Creating a Trustless Bitcoin Vault (TBV) locks BTC on the Bitcoin network and registers a matching vault record on Ethereum. This process is called a peg-in. The BTC stays on Bitcoin throughout: it is not bridged, wrapped, or transferred to a custodian. It is held in a Taproot output whose spend paths are committed by all participants before any Bitcoin moves.
A peg-in takes about 2 hours from submission to active vault.
The current public testnet enforces conservative per-vault, per-position, and per-application caps. These limits will grow as the protocol matures; see Protocol parameters for current values.
Before you start
You need:
- A UniSat Bitcoin wallet with signet support, set to Taproot (P2TR) address type and holding enough BTC for the vault size you want.
- An Ethereum wallet on Sepolia, with a small balance of Sepolia ETH for gas and the peg-in fee.
- Signet BTC and Sepolia ETH from the faucets listed in Setup.
The peg-in flow at a glance
A vault moves through these states during creation:
- Pending: the request is submitted; off-chain setup is running.
- Verified: setup is complete; the vault is ready for activation.
- Active: the BTC is locked in the vault and the vault is usable.
If the off-chain setup fails to complete within ~24 hours, the vault enters Expired. If the depositor never activates an already-Verified vault within ~48 hours of creation, the vault also expires, but the BTC is still recoverable via the Pre-PegIn refund path described later on this page.
Step 1: Decide how to split your BTC
Before filling in the deposit form, decide how to structure the deposit.
Single vault. One vault holds your full BTC amount. If your position is ever liquidated, the entire vault is seized whole; any over-seizure is handled by the fairness payment on Ethereum in WBTC.
Two-vault split (recommended). Split your BTC across two vaults of different sizes: a sacrificial vault (sized to cover the protocol's expected seizure amount, placed first in the liquidation order) and a protected vault (whatever BTC remains, placed second). During a liquidation the protocol seizes vaults from the front of your order until it has enough to cover the target seizure.
Why the split works: each vault is a single Bitcoin UTXO and cannot be subdivided. The protocol can only seize whole vaults. With one vault, the smallest possible seizure equals your entire deposit. With two correctly-sized vaults, it equals only the first vault in order. See Liquidation risk for the full mechanism and the fairness payment that returns any surplus.
The app sizes the split dynamically from on-chain parameters. At current public-testnet parameters, the sacrificial vault is the larger of the two and sits first in the order. You can reorder vaults after creation, so the choice is not final. See Reorder vaults later below.
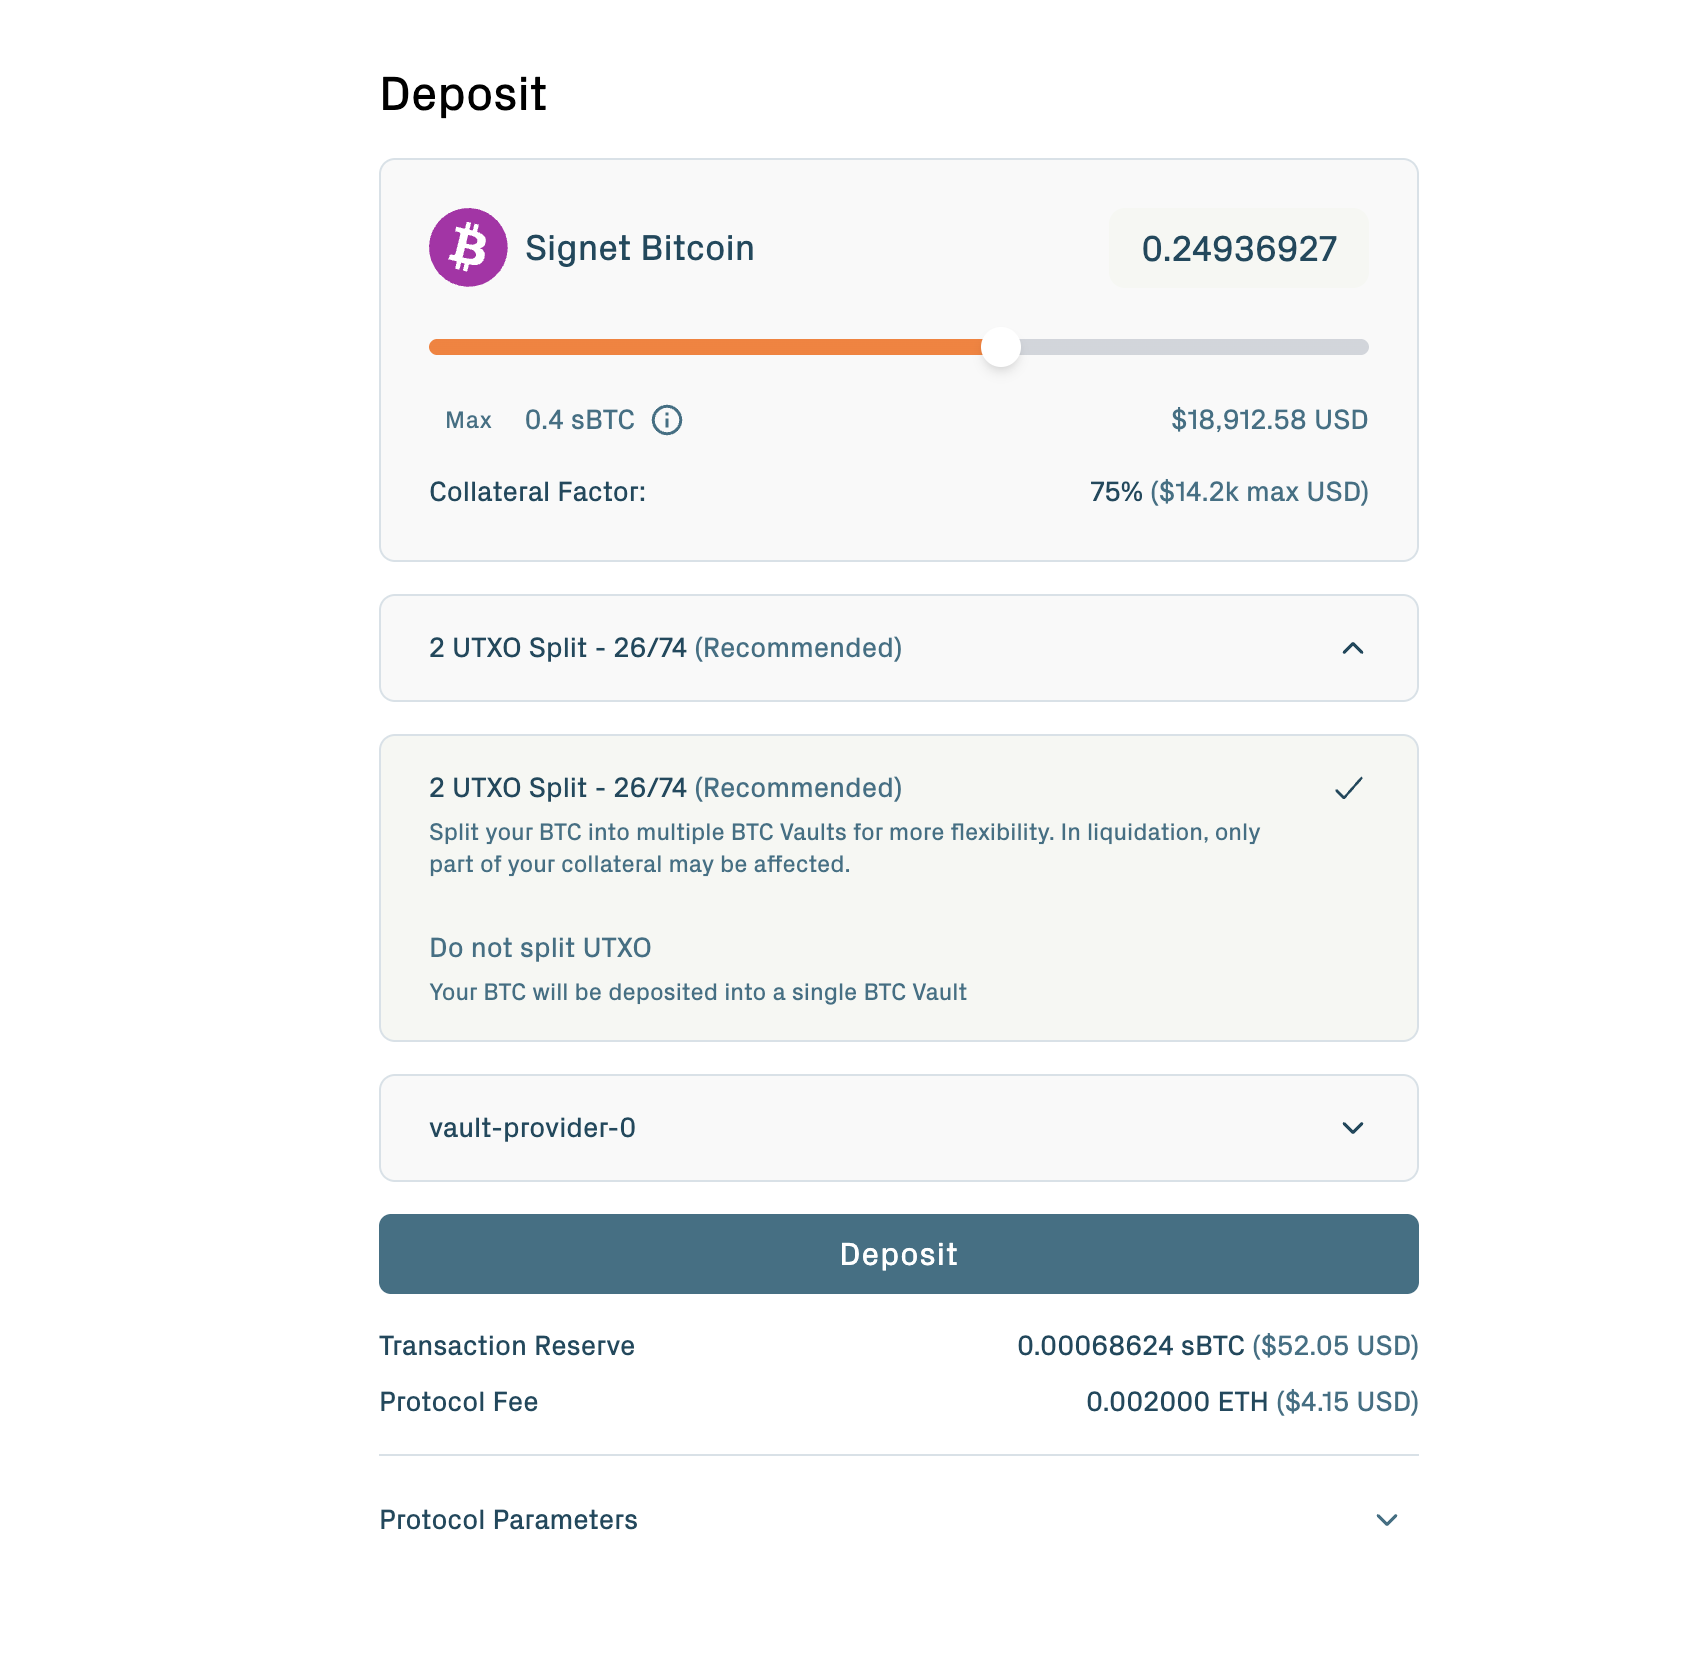
If your deposit is too small to split: the sacrificial vault must independently meet the minimum vault size. If your total BTC is below the threshold that lets the sacrificial vault clear the minimum, the portal falls back to a single-vault flow. See Protocol parameters for the current minimumPegInAmount.
Step 2: Select a vault provider
The Vault provider dropdown lists the providers available for new vaults.
A Vault Provider runs the off-chain coordination required to create and later redeem your vault: generating proof material, holding pre-signed transactions, and coordinating with Application Vault Keepers. The provider never holds or controls your BTC. The Bitcoin spend conditions are committed by all participants at vault creation, and the provider's role is operational, not custodial.
Each Vault Provider sets its own commission (the percentage of BTC the VP receives at peg-out). Different VPs may compete on commission rates; the commission applies to vaults created under that VP and is locked at vault creation.
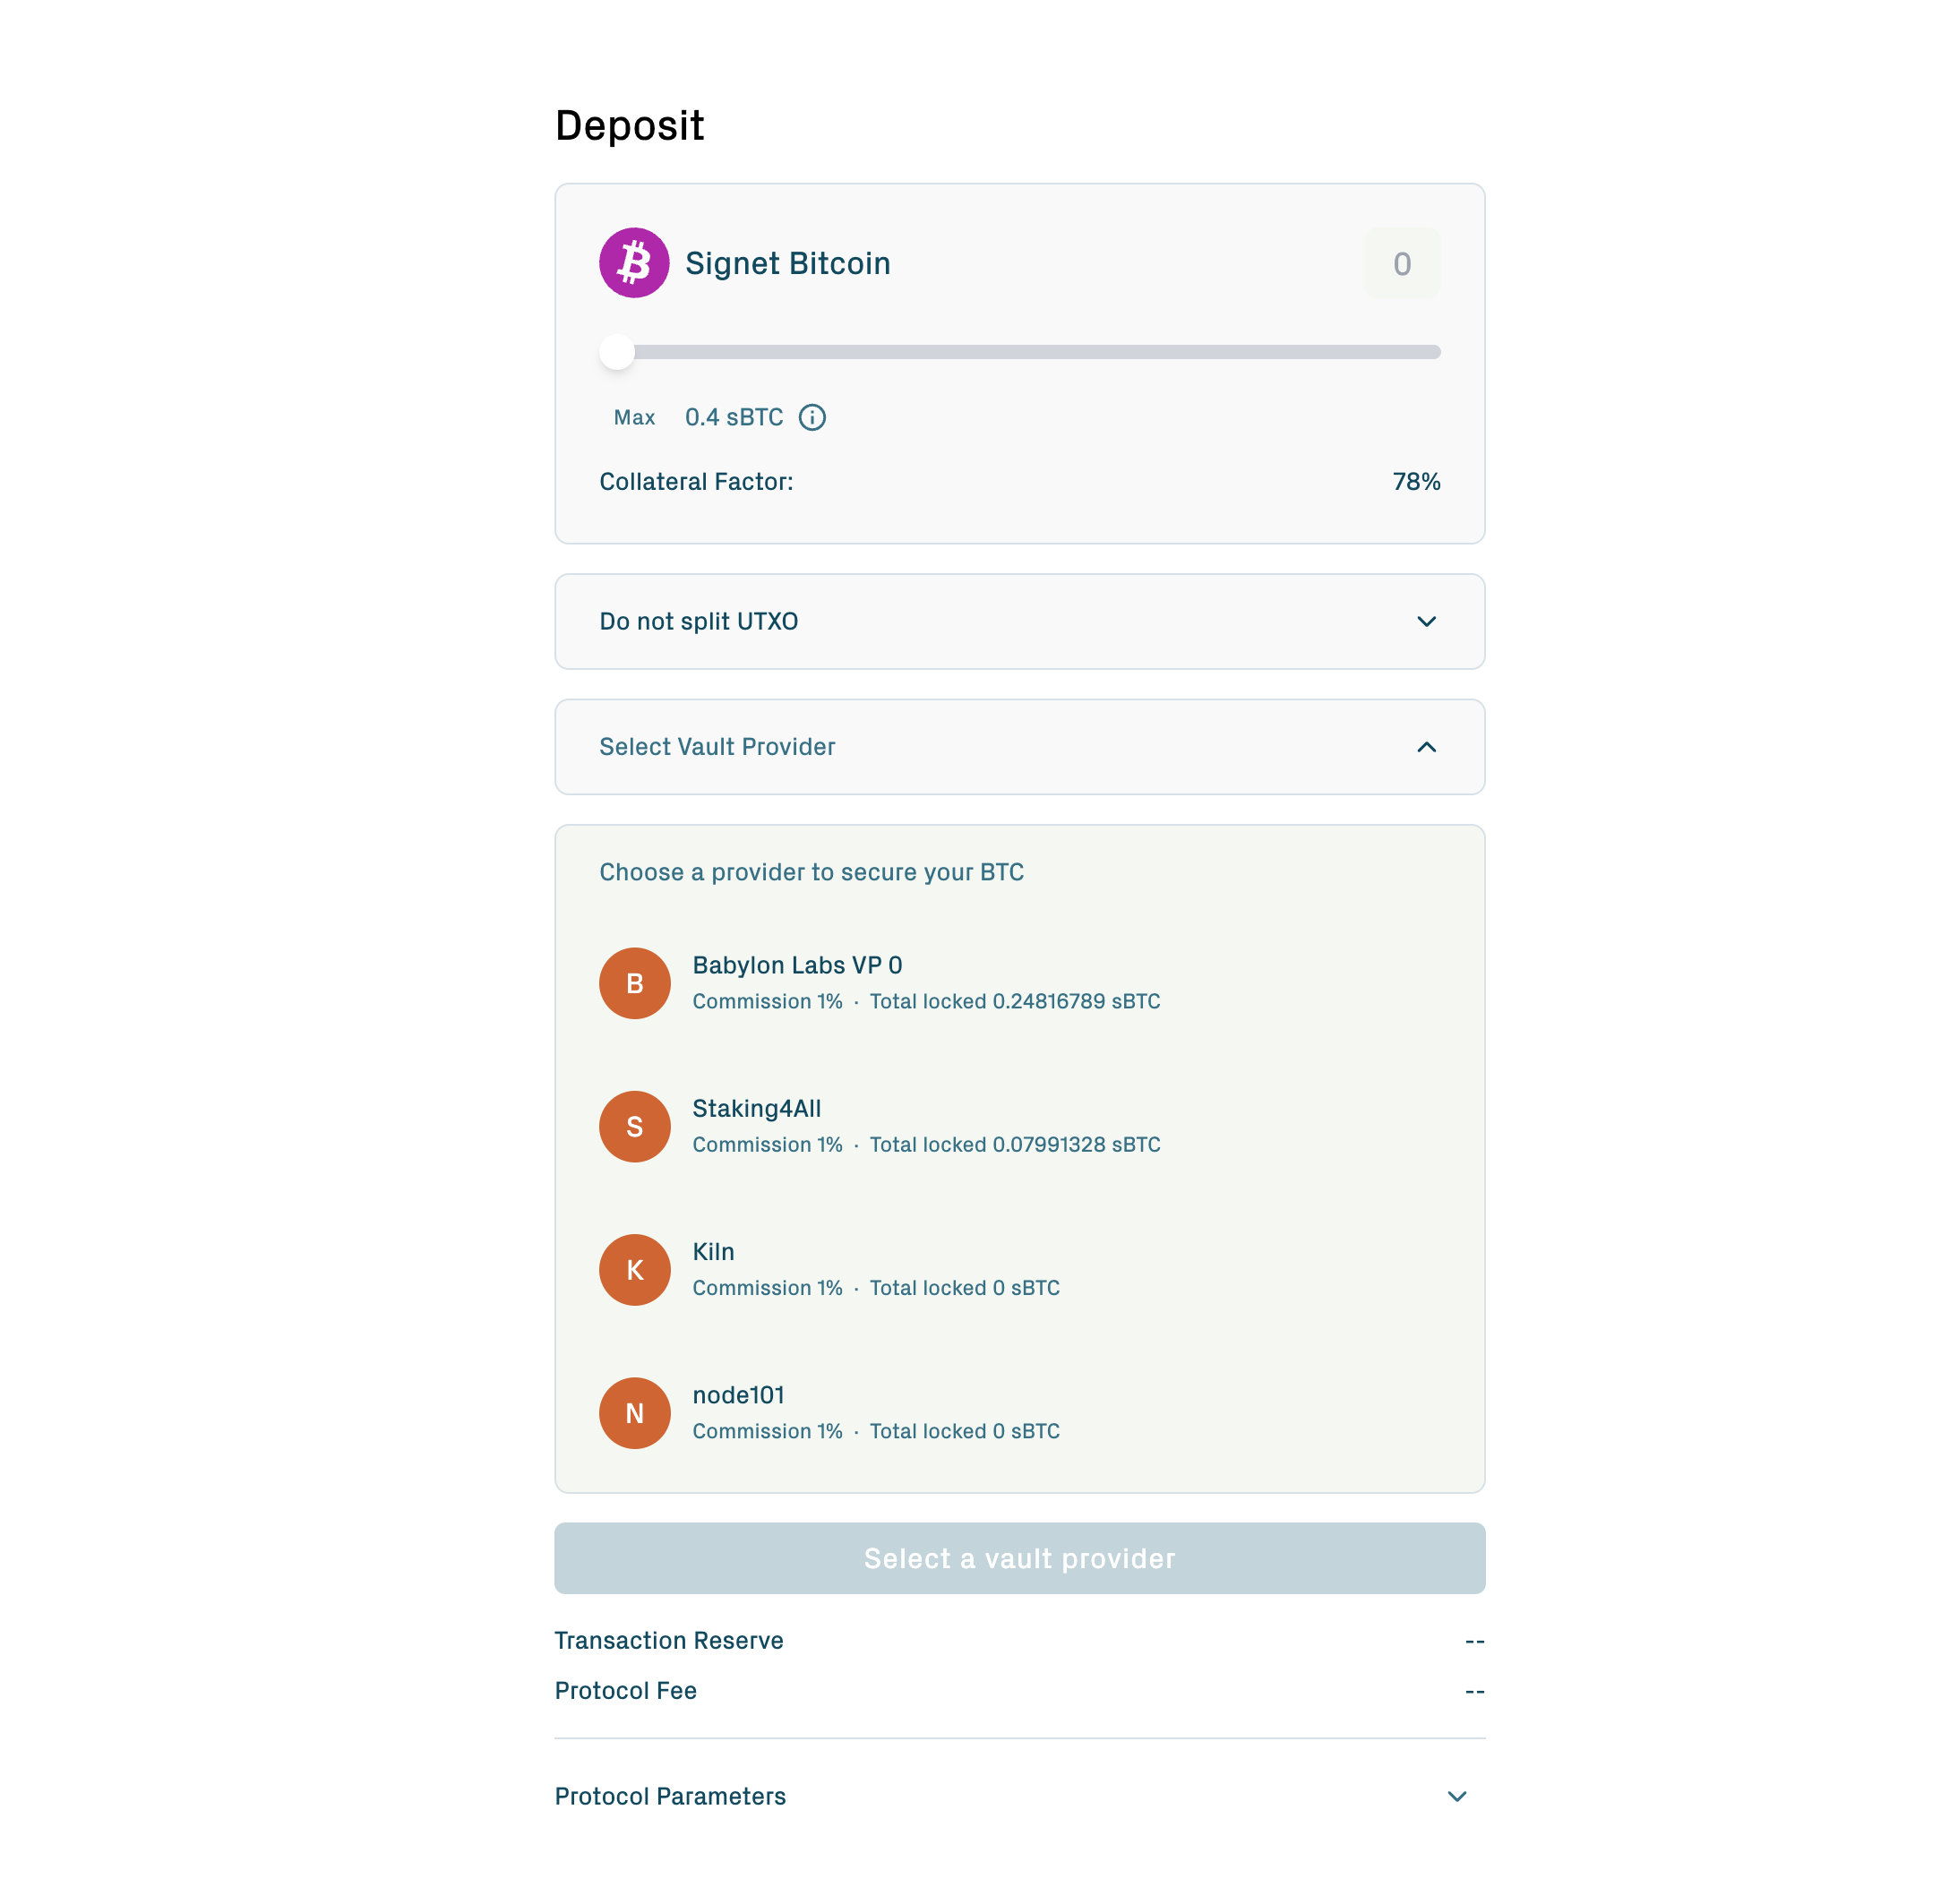
The Vault Provider associated with a vault is immutable. Once your vault is created with a specific provider, that provider serves the vault for its entire lifetime. If a provider becomes unresponsive later, the protocol's depositor self-claim path still lets you recover your BTC unilaterally. See Withdraw & redeem.
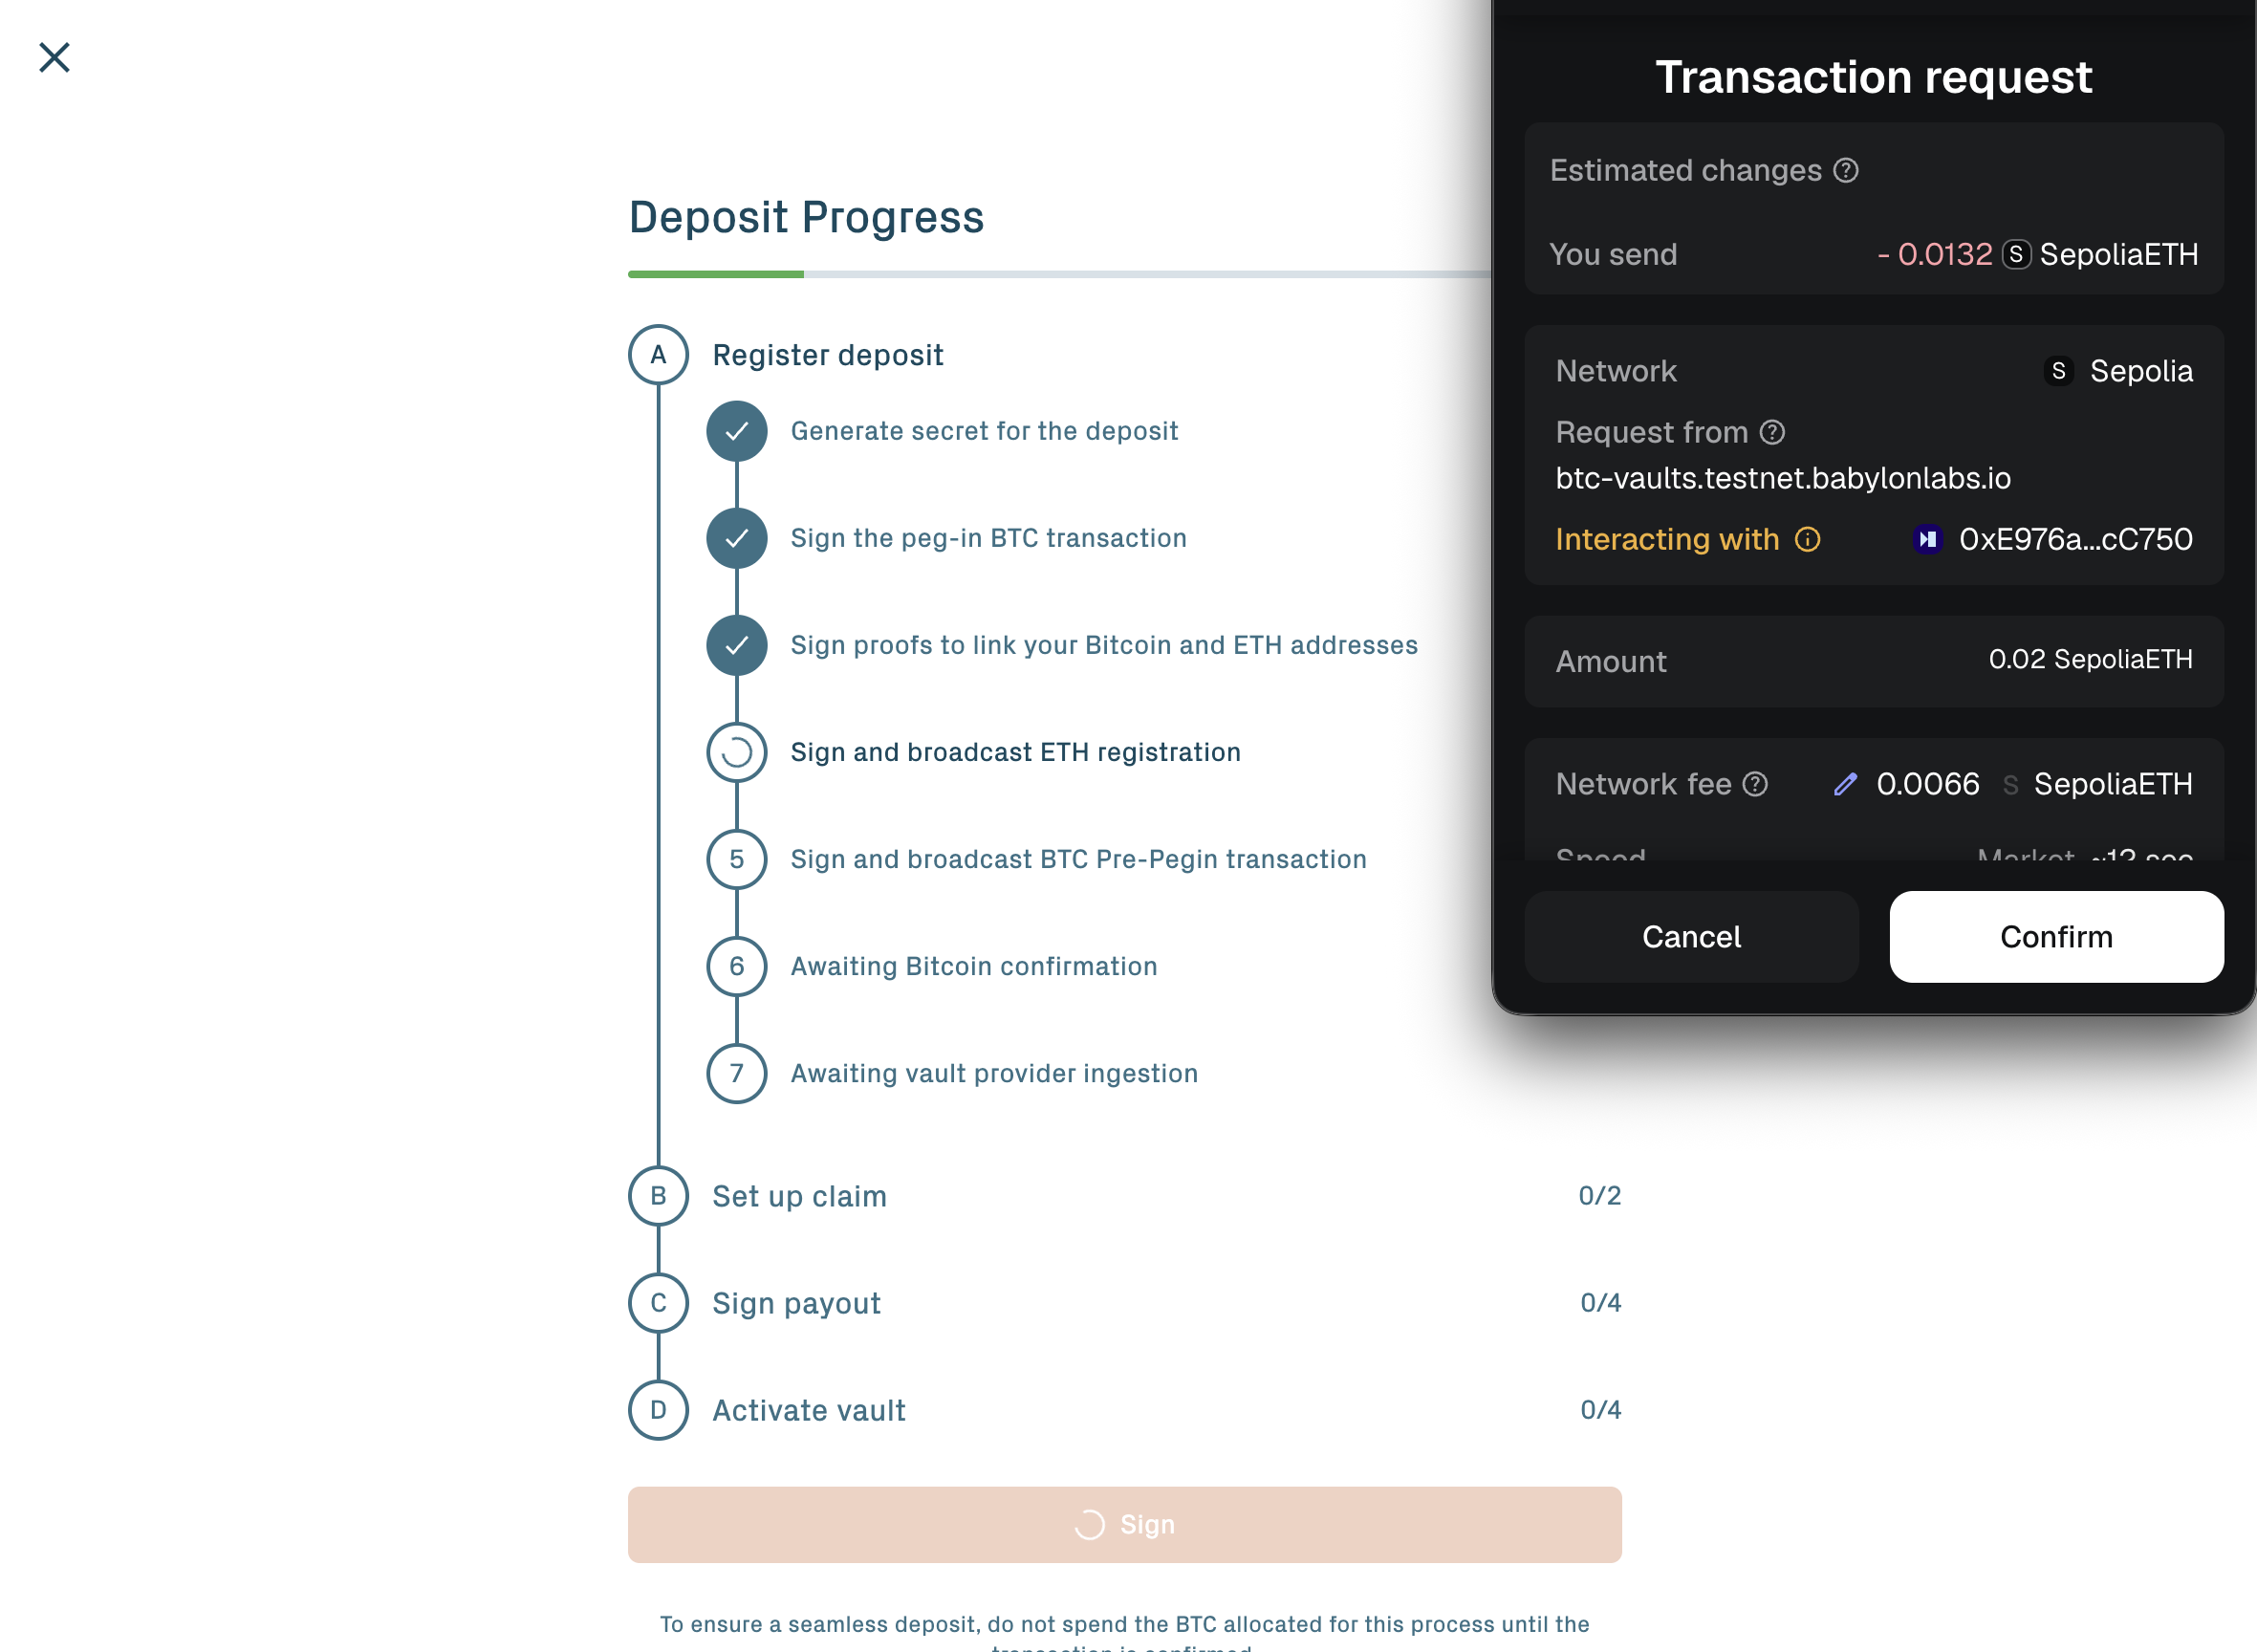
Step 3: Submit the peg-in request
Click Deposit. The portal then asks you to sign two transactions in sequence.
The Ethereum transaction. This submits the peg-in request to the BTC Vault Manager contract. The request includes a hashlock: the SHA-256 hash of a 32-byte secret generated by the portal and stored in your wallet. The vault is created in Pending state. A peg-in fee in Sepolia ETH funds the off-chain setup work; see Protocol parameters for the current value.
The Bitcoin transaction. This broadcasts the Pre-PegIn transaction, which locks your BTC into a Taproot output committed to the hashlock from the first step. The BTC is now in escrow on Bitcoin.
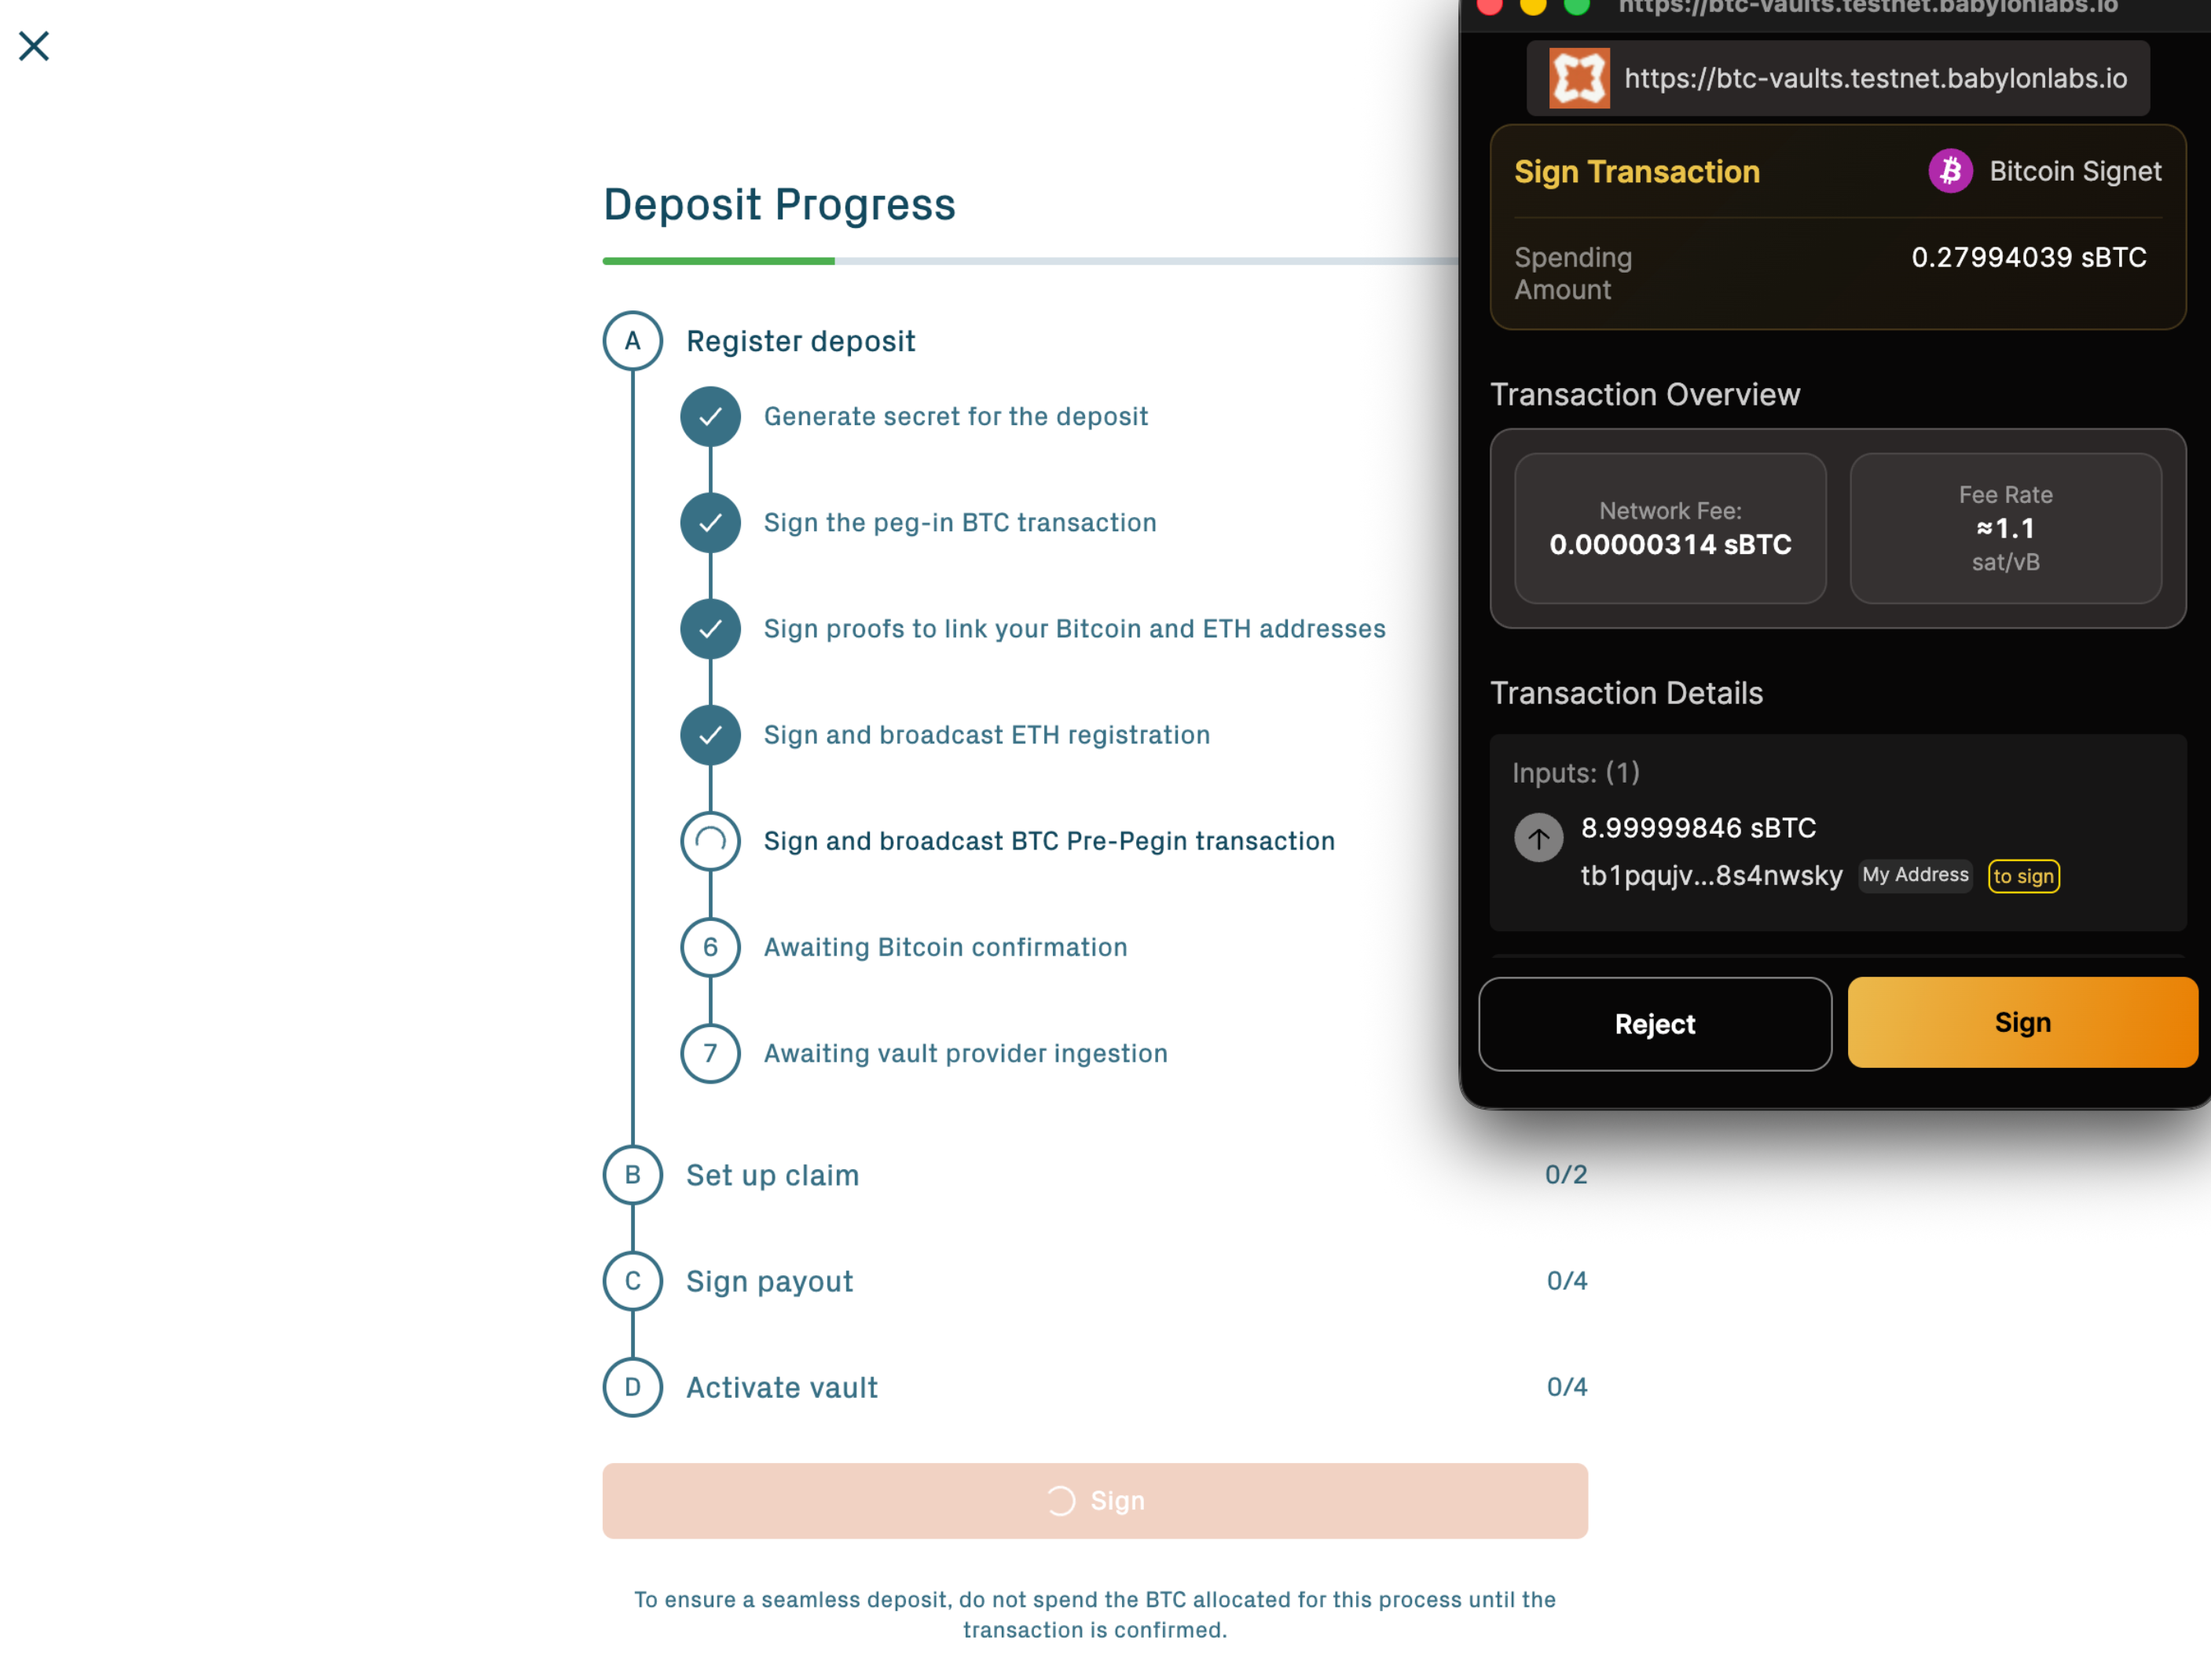
The Pre-PegIn output has two spend paths:
- A hashlock path requiring signatures from all vault participants plus the revealed secret. This is the path the protocol takes during normal activation.
- A refund path locked behind a Bitcoin timelock. This is the path you take if the peg-in stalls. See If activation stalls below.
You don't manage these paths directly. They are part of the pre-signed Taproot script agreed during setup. The Pre-PegIn transaction also includes a small CPFP anchor output that the portal can use to fee-bump the Pre-PegIn if Bitcoin mempool fees spike before confirmations land.
If you chose the two-vault split, the portal broadcasts a single Pre-PegIn transaction with two HTLC outputs (one per vault), saving on Bitcoin fees and ensuring both vaults activate together.
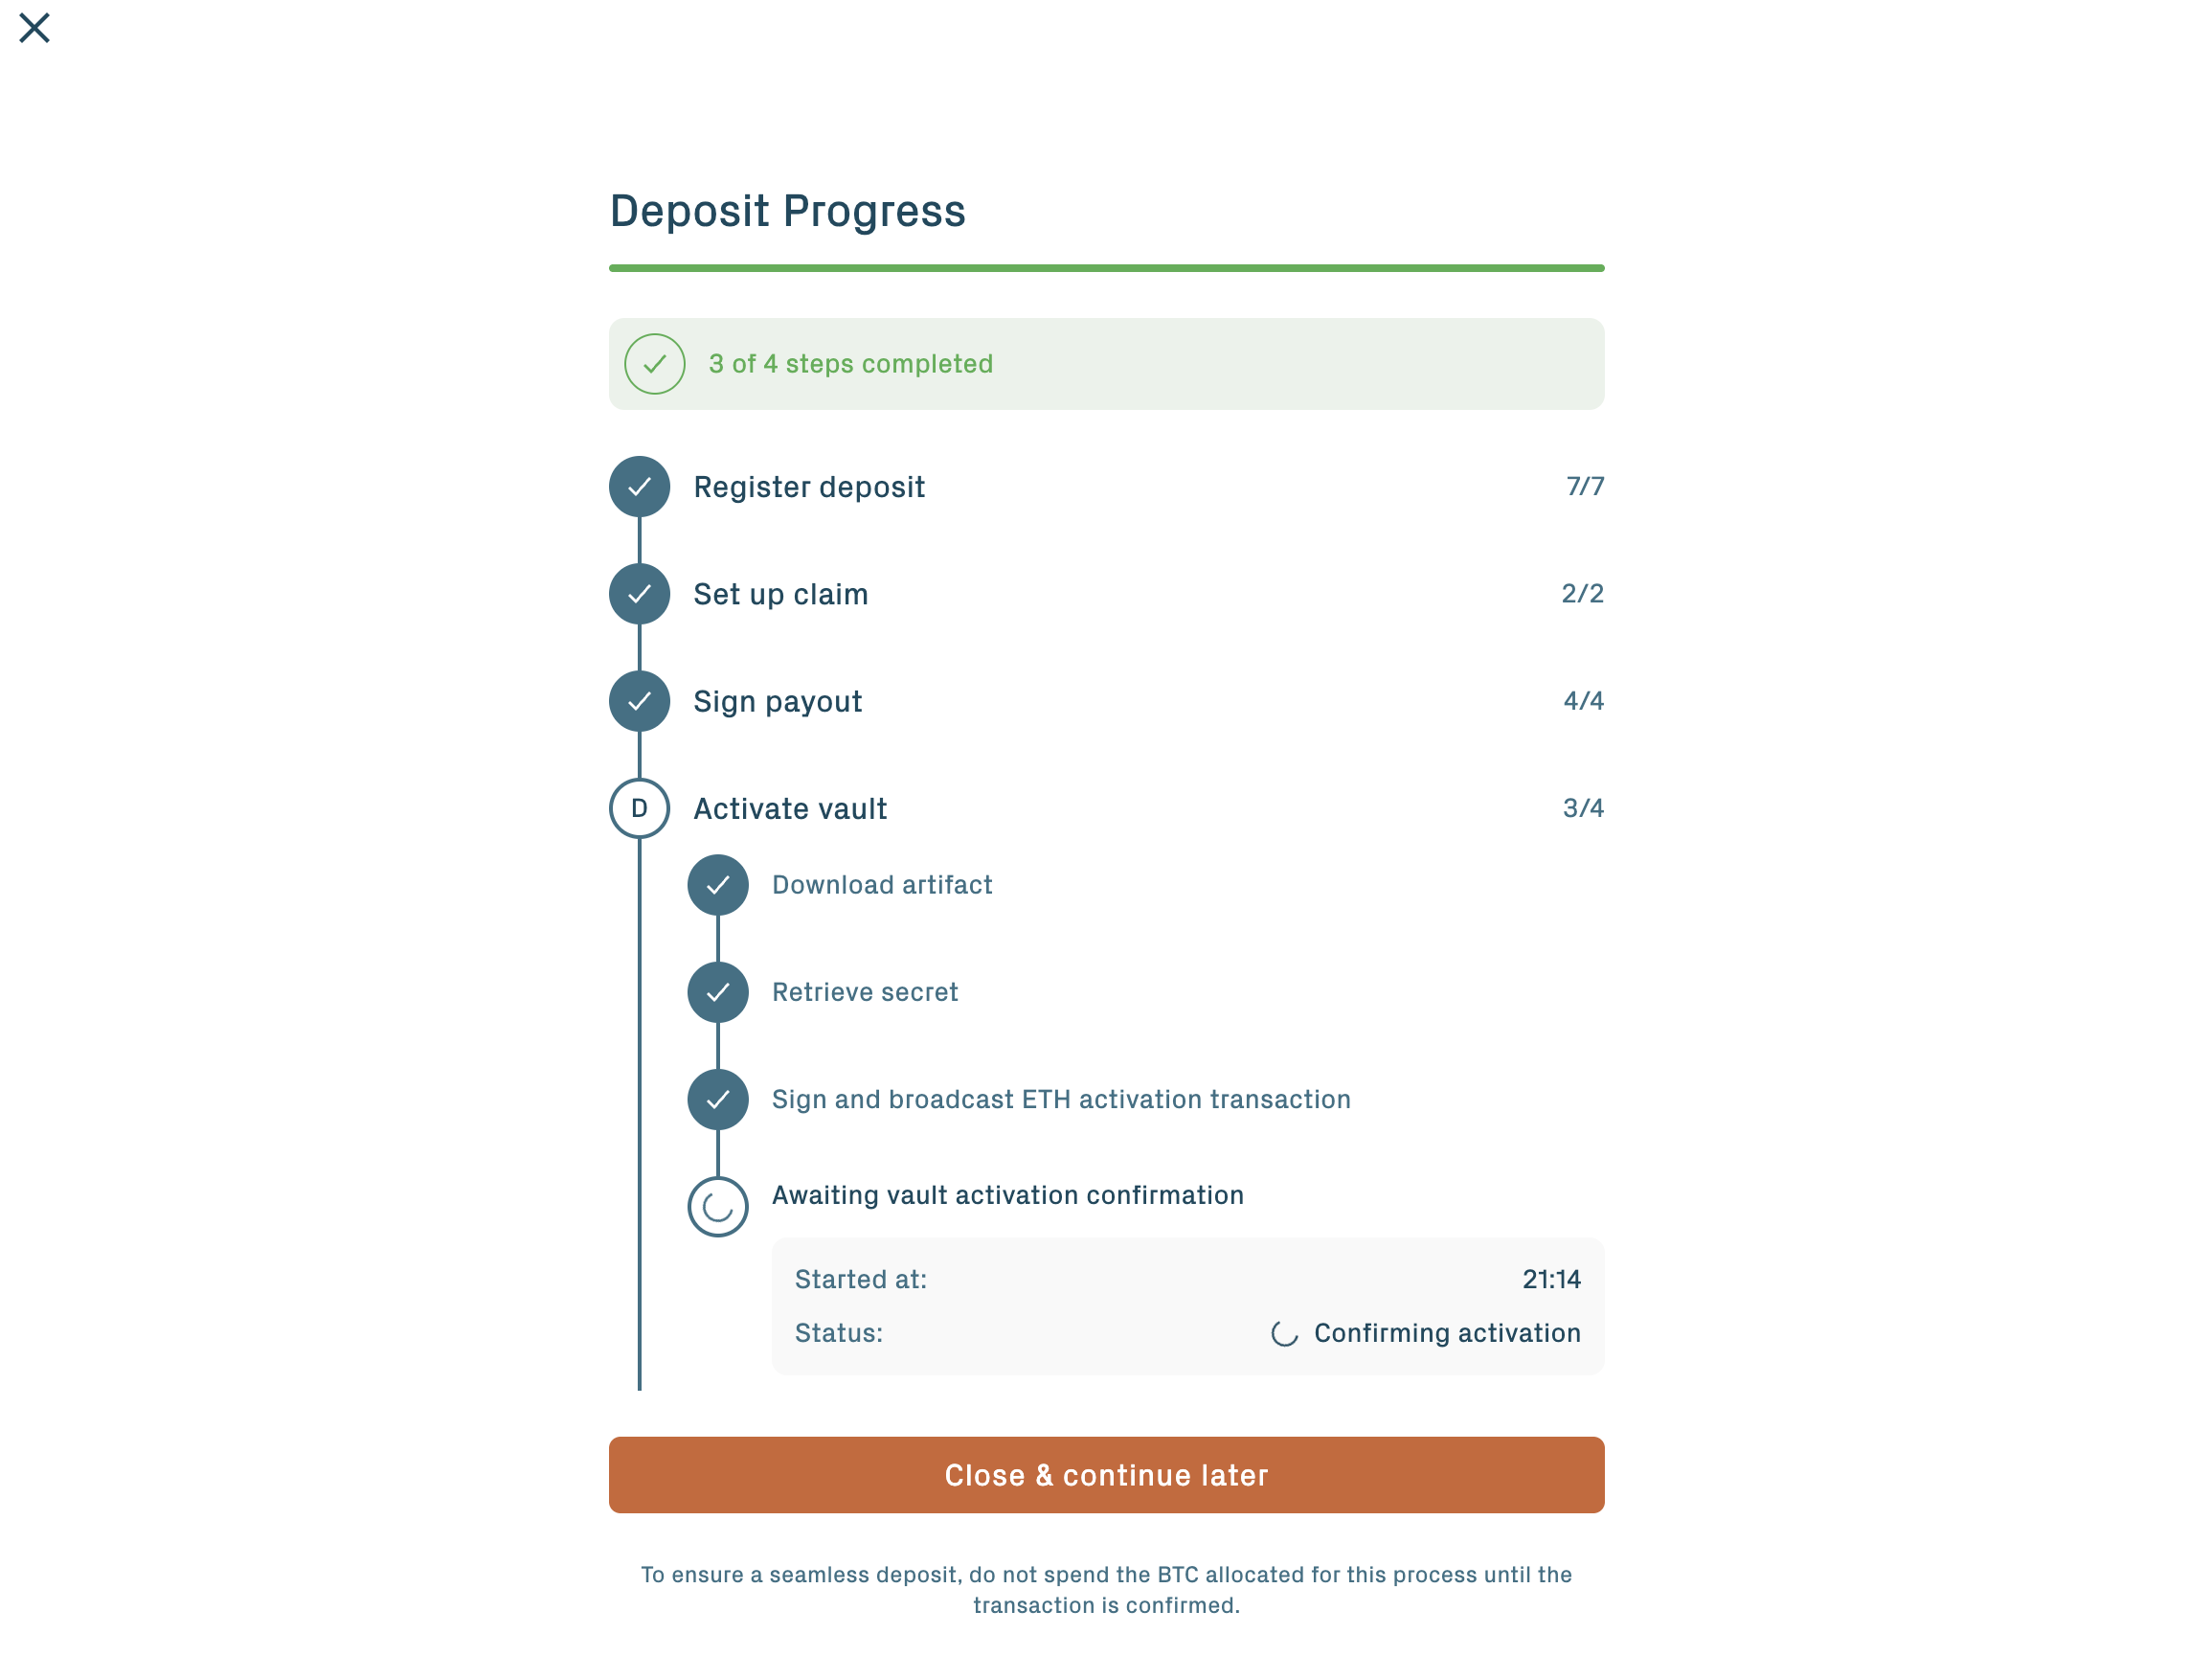
Step 4: Wait for confirmations & setup
After submission, two processes run in parallel.
Bitcoin confirmations. The Pre-PegIn transaction must reach 12 Bitcoin confirmations on signet (about 120 minutes, at one signet block every ~10 minutes) before the protocol can finalize the vault setup. Leave the portal open or close it: progress is tied to your wallet address, not to the browser session.
Off-chain setup. The Vault Provider, Application Vault Keepers, and Universal Challengers coordinate the vault's pre-signed transaction graph: the complete set of pre-signed Bitcoin transactions covering every possible vault outcome (withdrawal after repayment, liquidation, fraud-challenge response, Pre-PegIn refund). Each participant signs their share and posts on-chain acknowledgments to confirm readiness. This sequence takes about 6 to 10 minutes once the Pre-PegIn has the required confirmations.
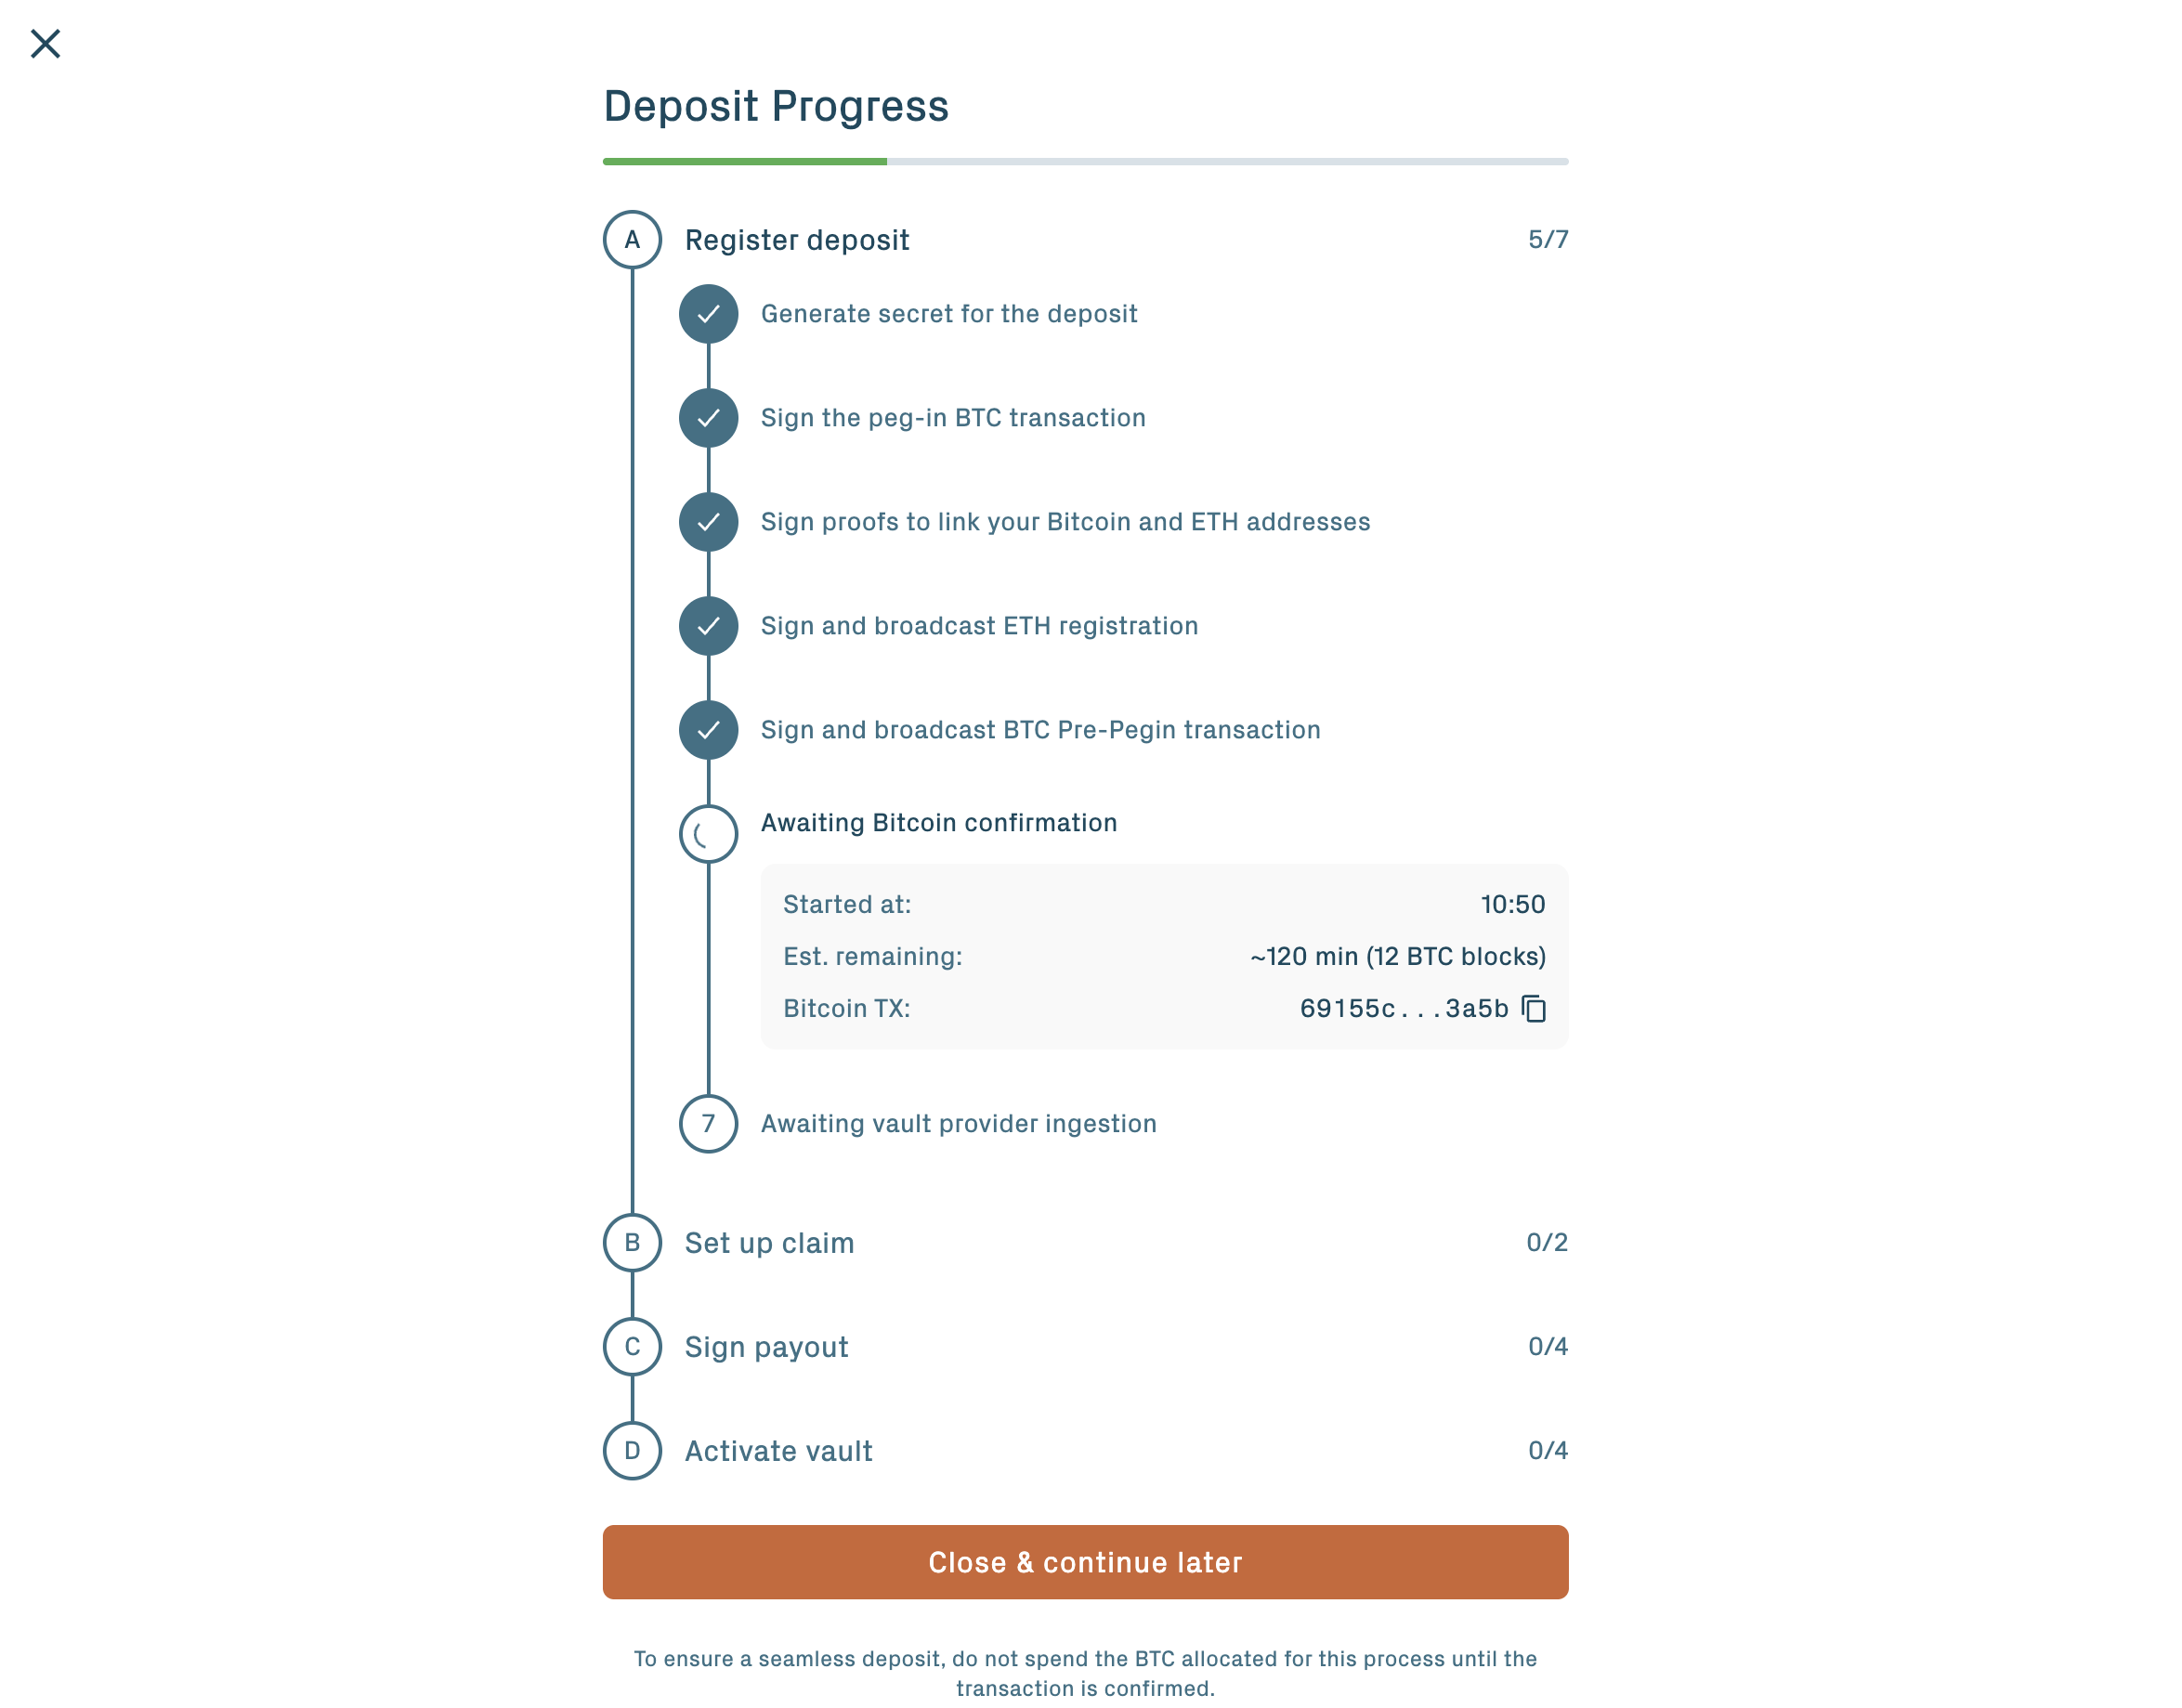
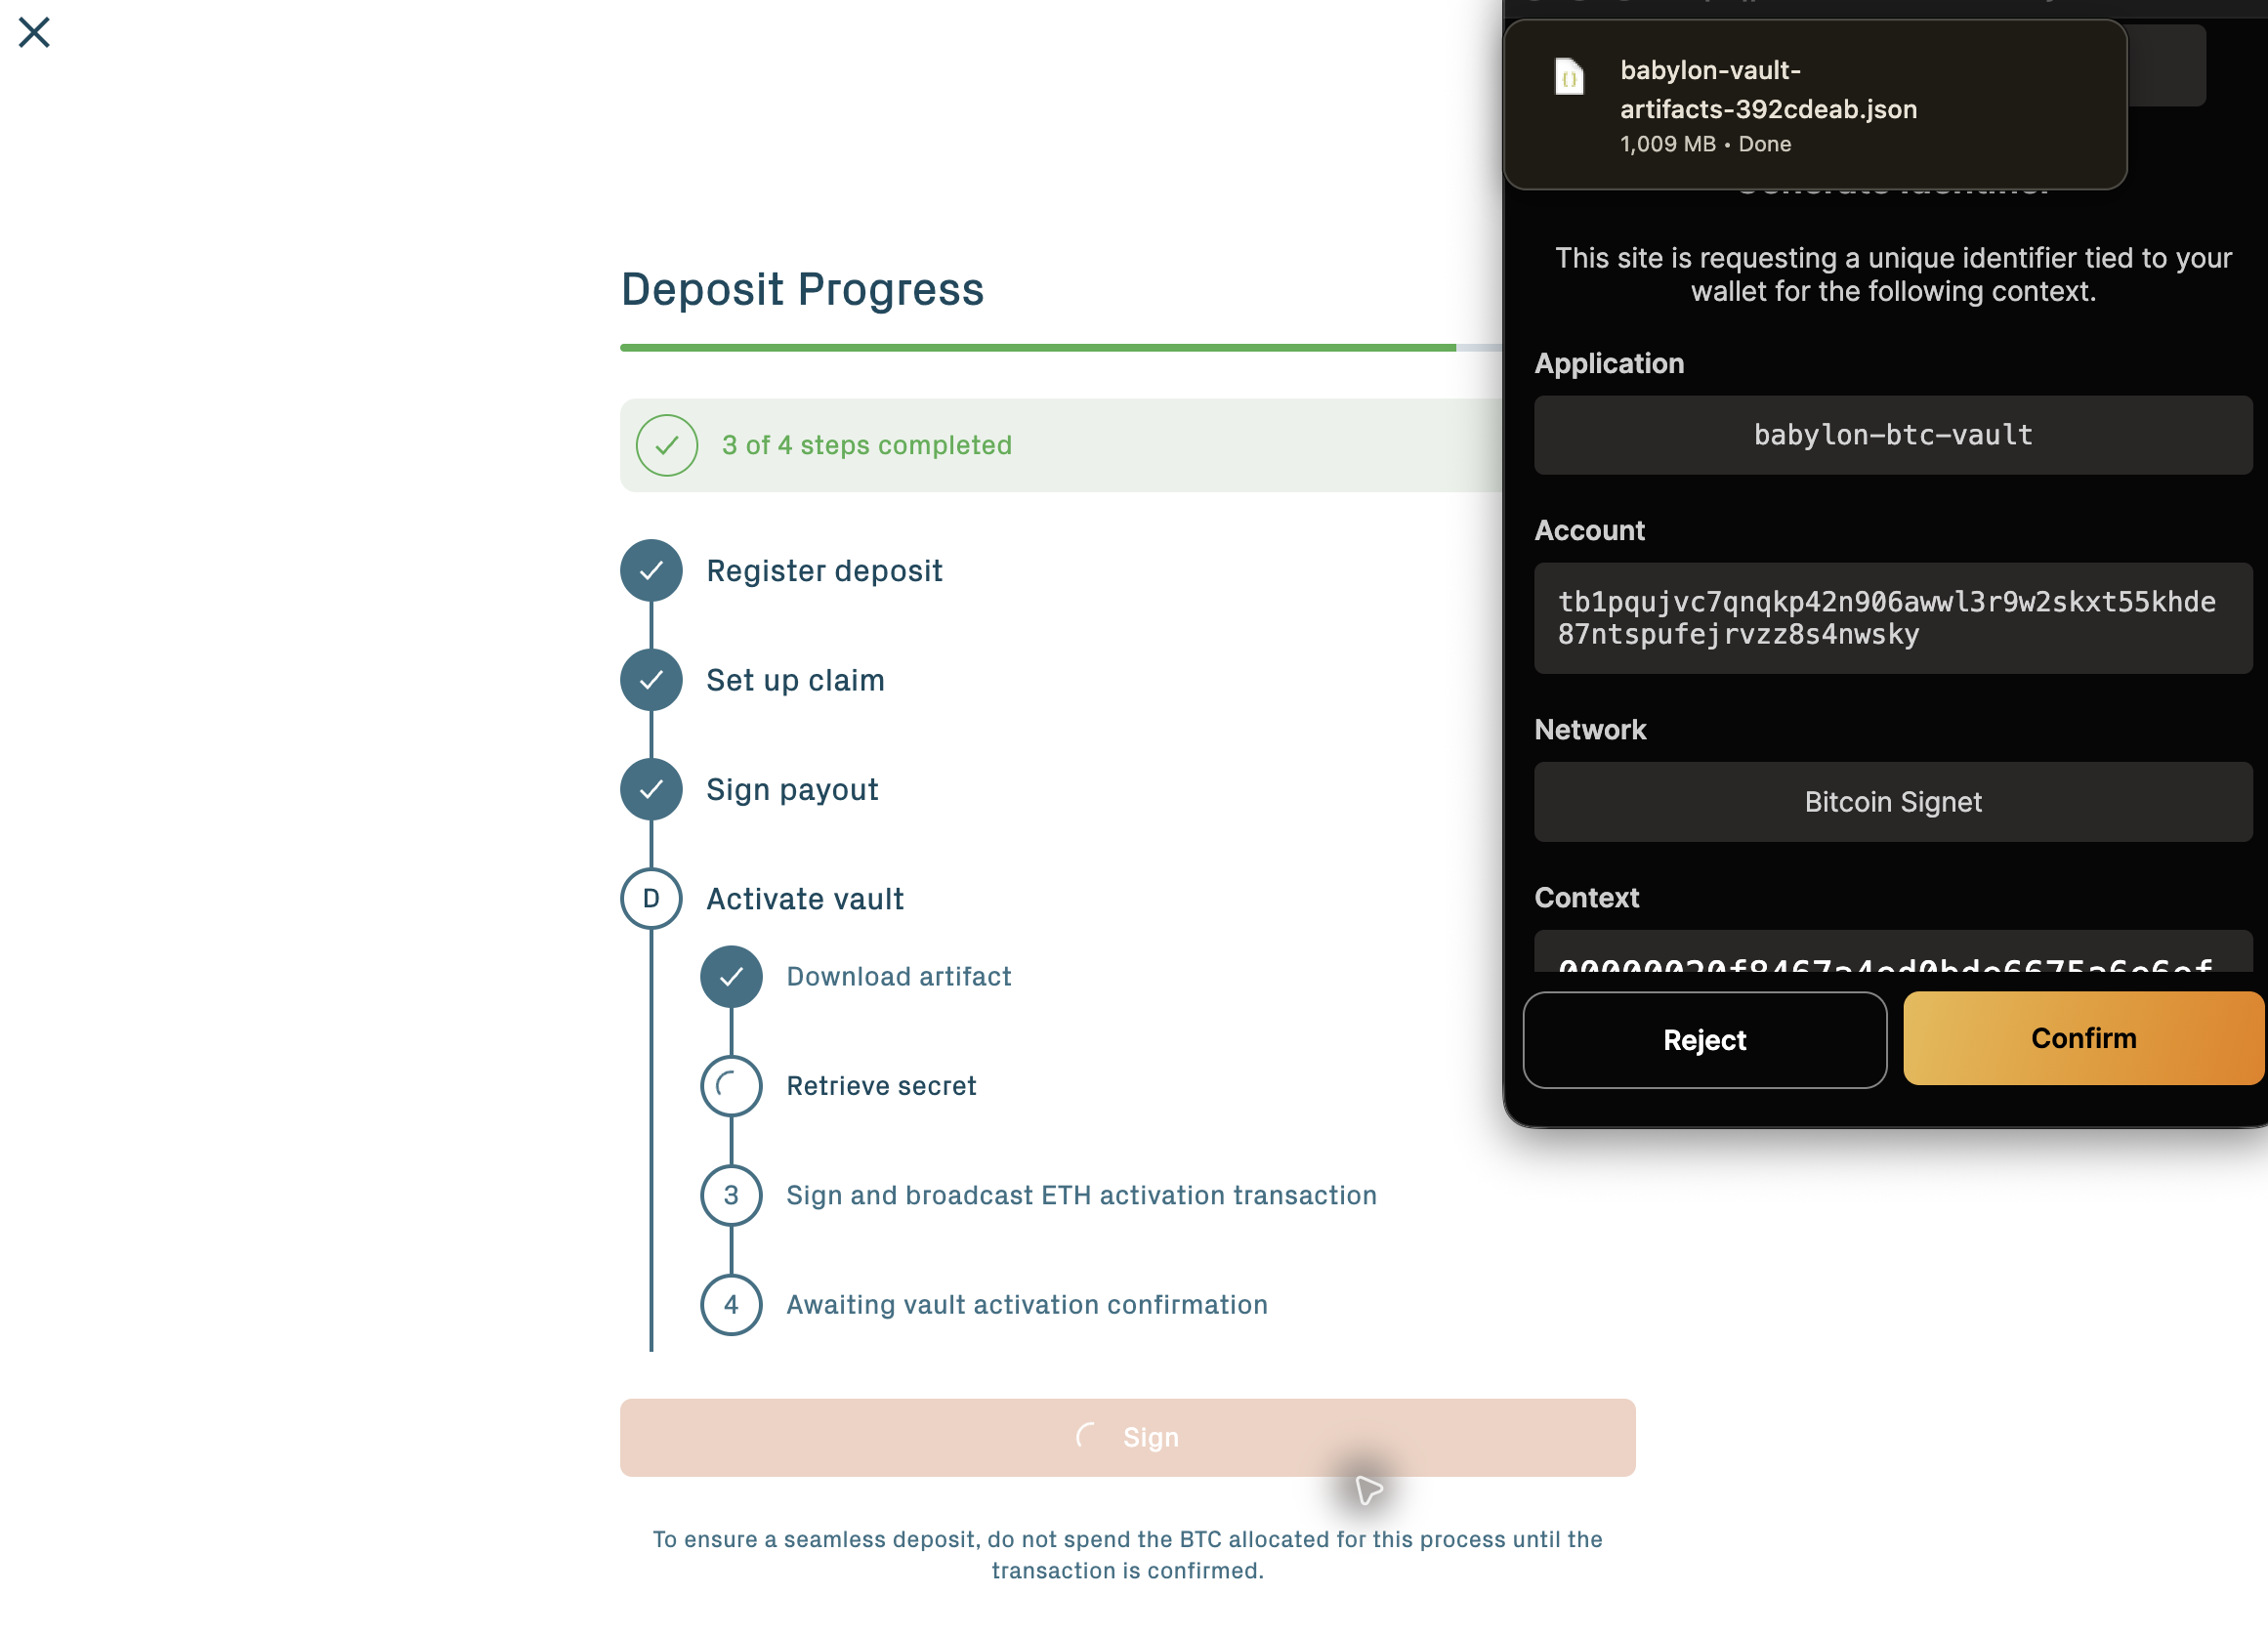
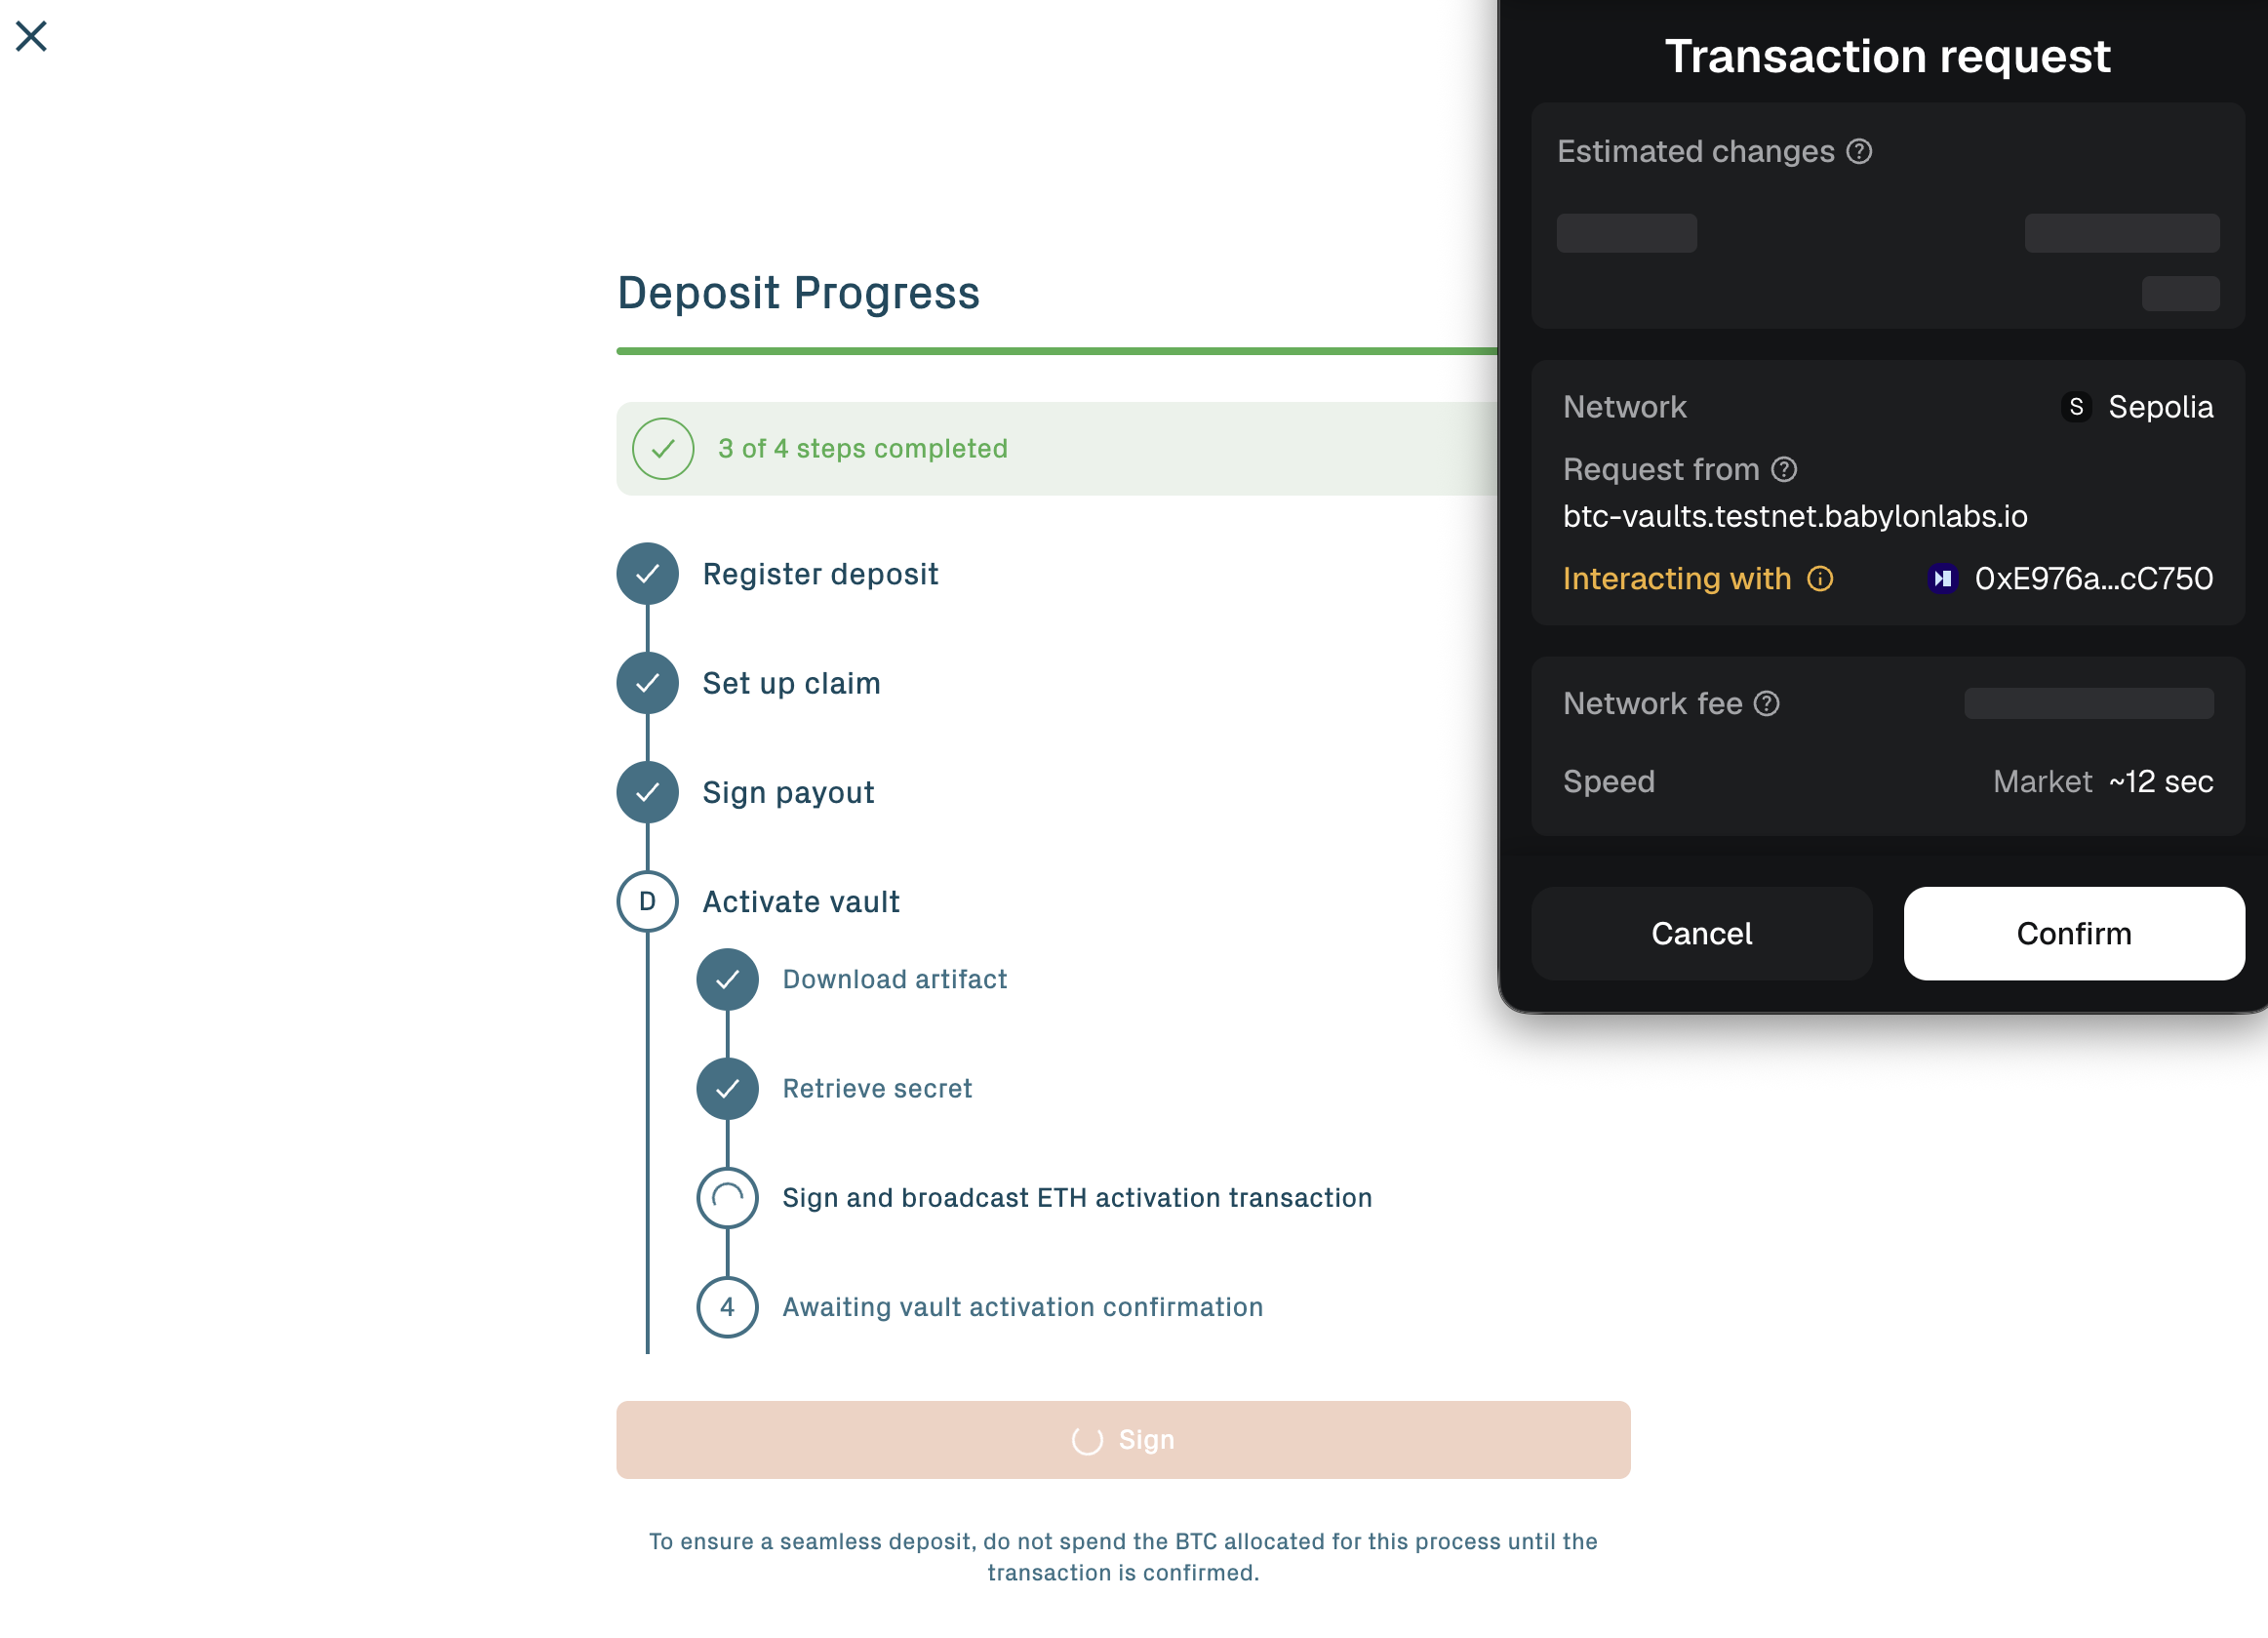
The portal shows progress against each milestone. Once setup reaches the signing phase, the portal prompts you to sign two batches of Bitcoin transactions in your wallet — the next two steps below cover each — and then to download claimer artifacts. After those three depositor actions, the vault transitions to Verified.
Behind the scenes, the off-chain setup builds a tamper-evident Bitcoin transaction graph: every legitimate spend path is signed up front by every required participant. After the vault is created, no participant can fabricate a new spend.
Step 5: Sign the Claim transaction graph
Once the off-chain setup reaches the depositor-signature phase, the portal prompts you to sign the Claim transaction graph — your set of Bitcoin Schnorr signatures (Taproot script-path) over the pre-signed Claim, Assert, ChallengeAssert, and supporting transactions that the protocol will use during peg-out. Each signature commits you to the agreed exit paths before any BTC is moved into the vault.
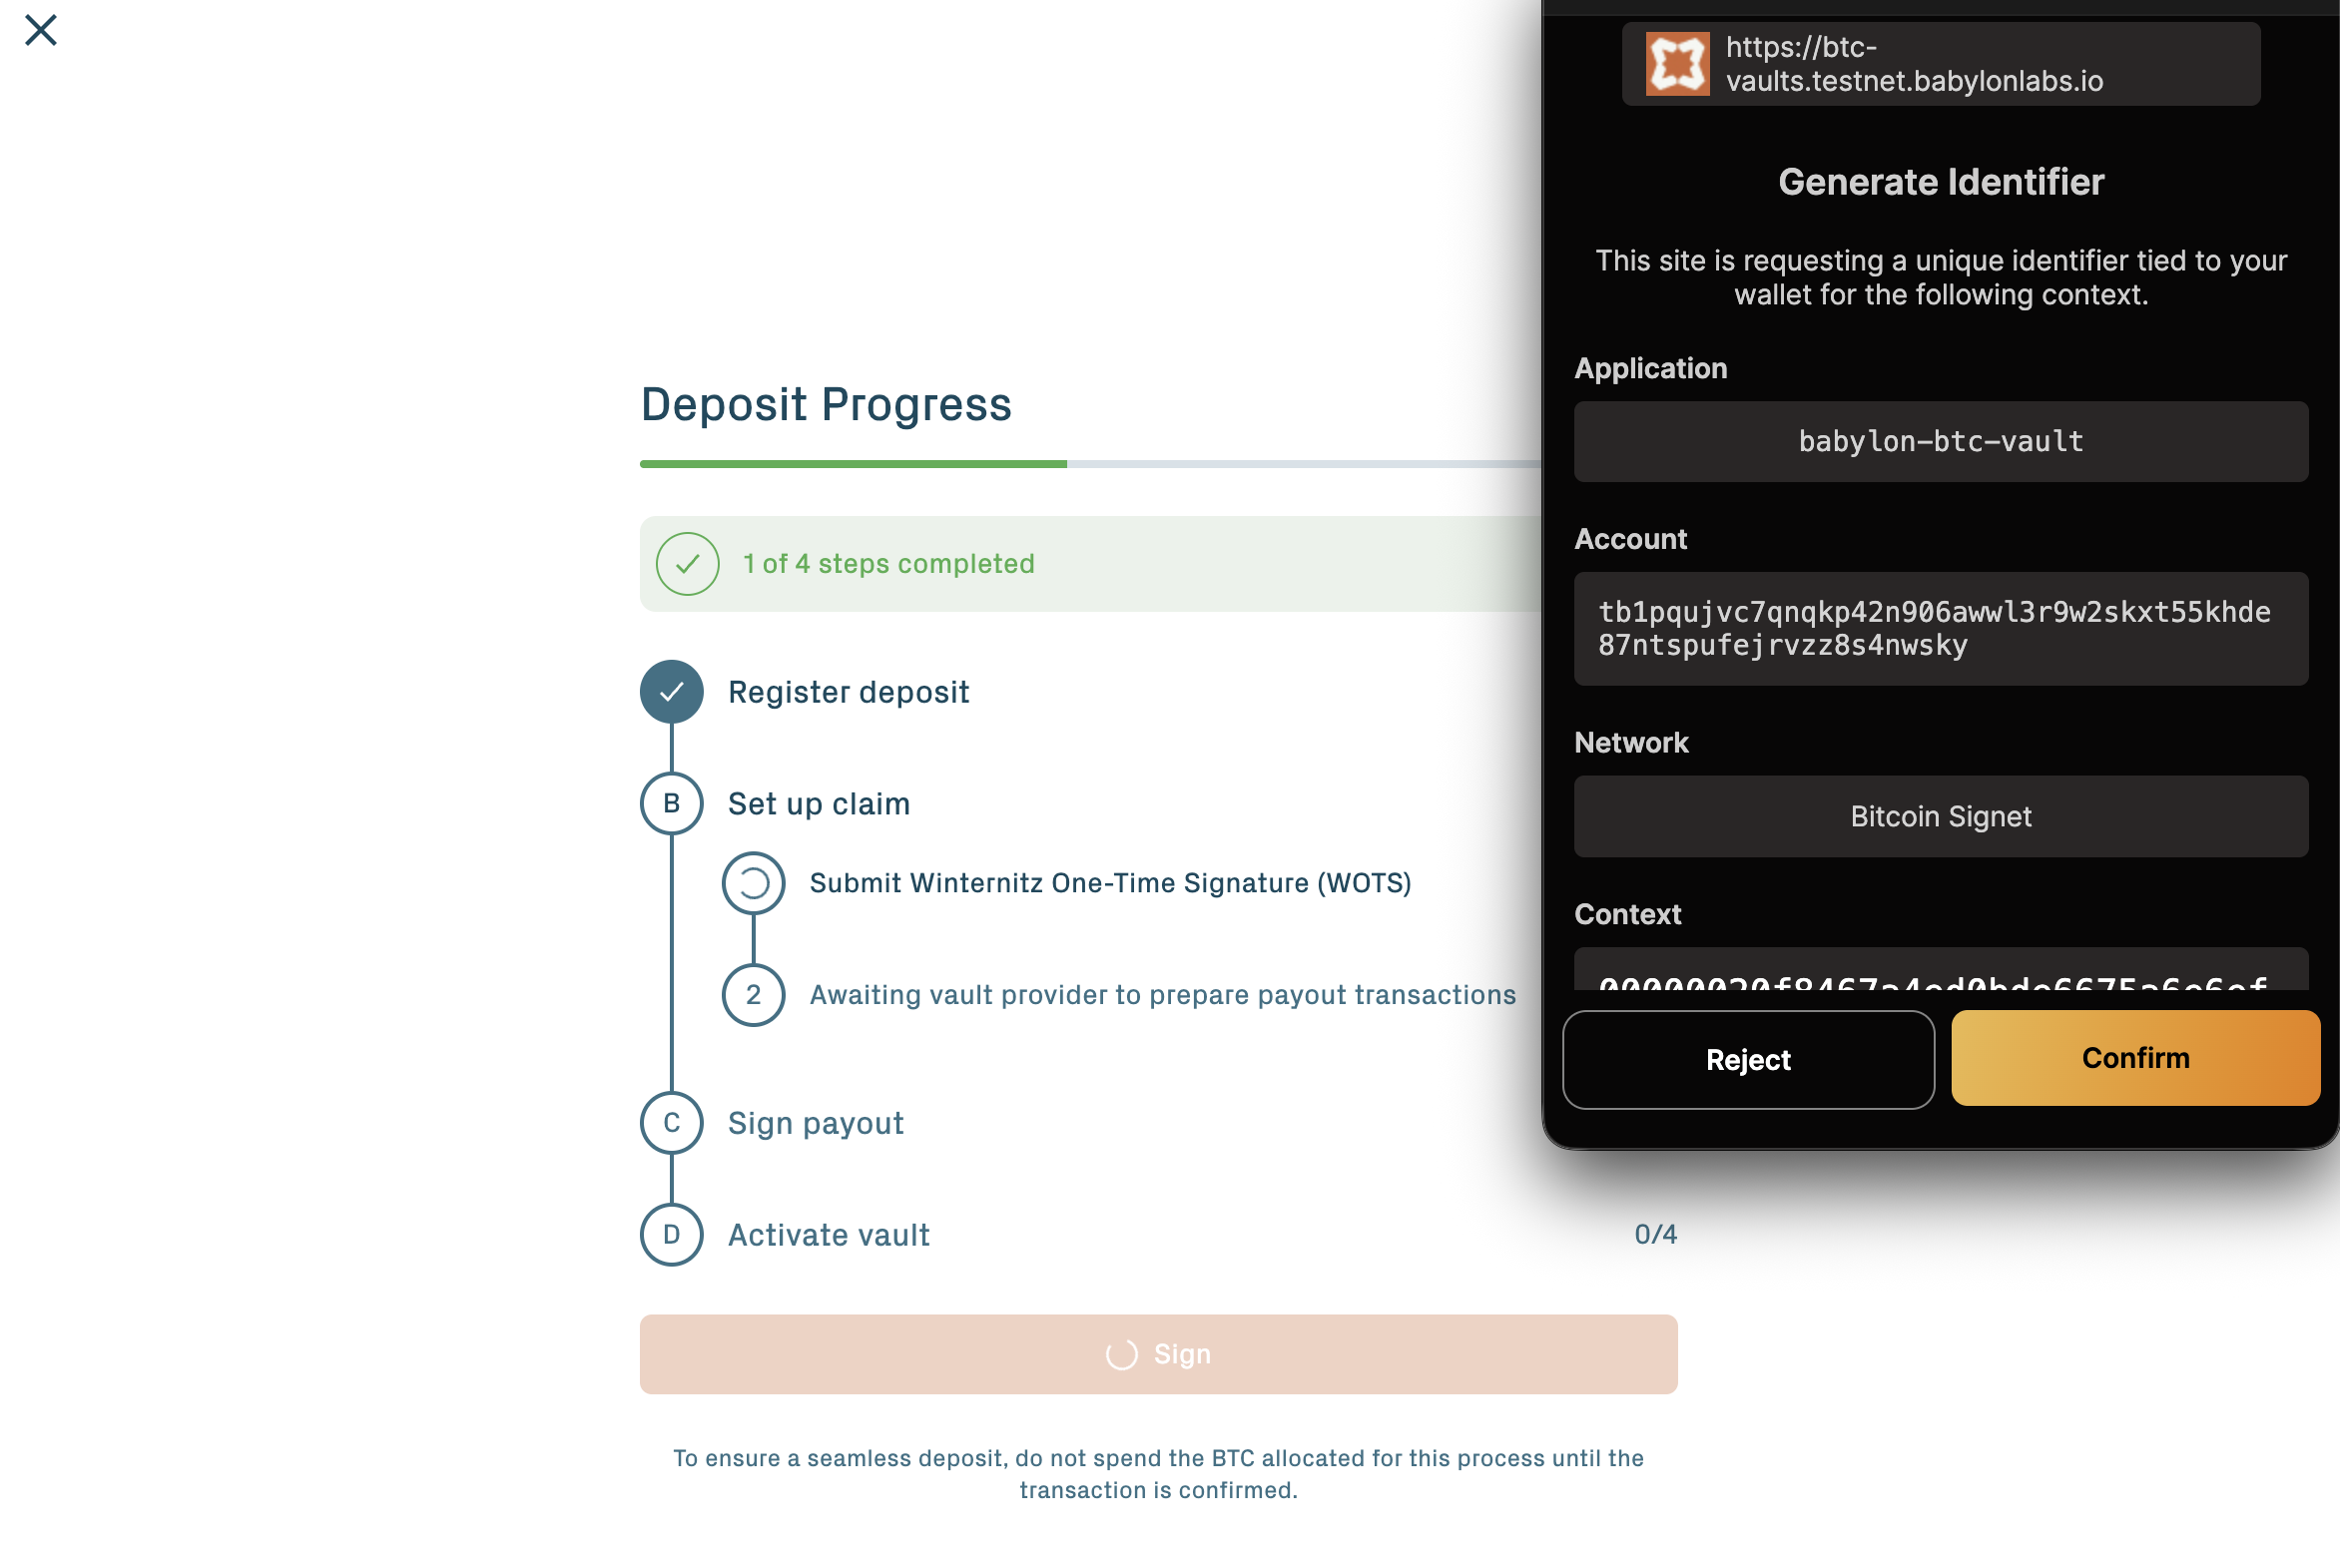
Approve the signing prompts in your Bitcoin wallet. There are multiple transactions to sign; the portal batches them so you only see a small number of wallet prompts.
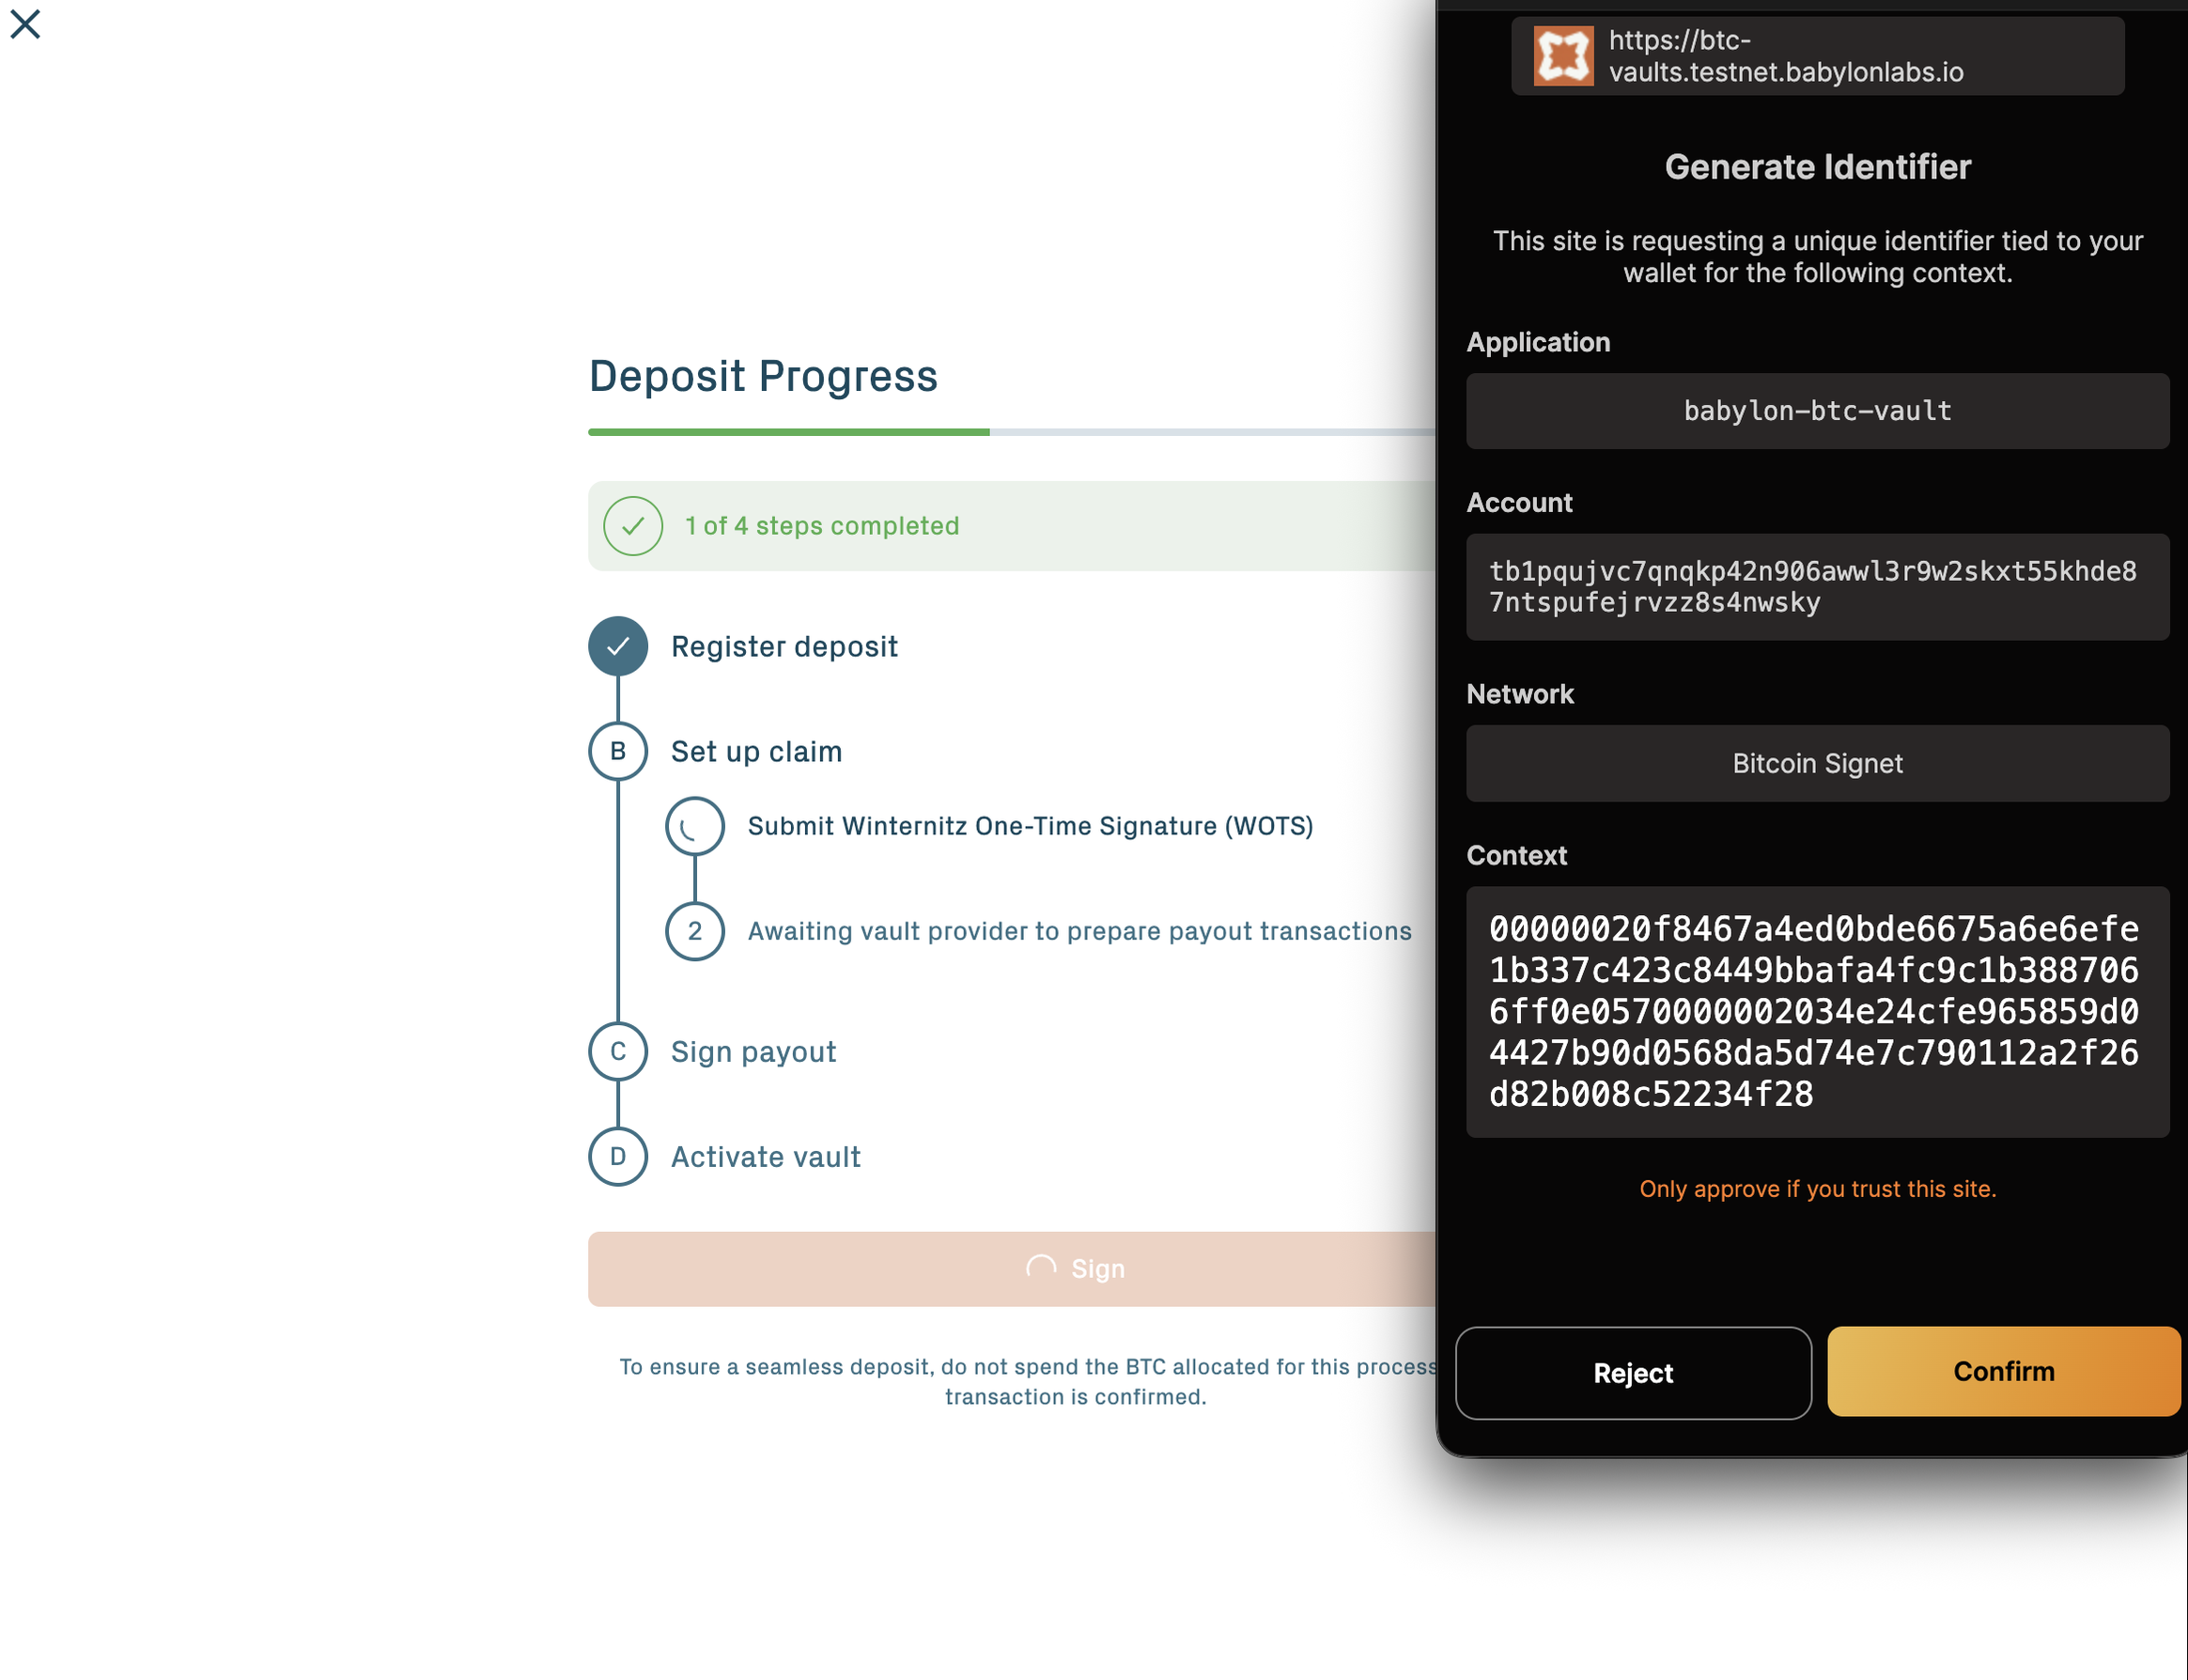
What you're actually signing: the depositor leg of the vault's pre-signed transaction graph. After this step, the protocol can build a valid Claim+Payout sequence on Bitcoin only on the spend paths you've signed off on. You can't be surprised later by a new spend the protocol could take — the set is fixed here.
Step 6: Sign the Payout transactions
The portal next prompts you to sign the Payout transactions — the depositor-side signatures on the BTC payout outputs. These are what authorise the protocol to release your BTC back to the address recorded in the vault at peg-out time.
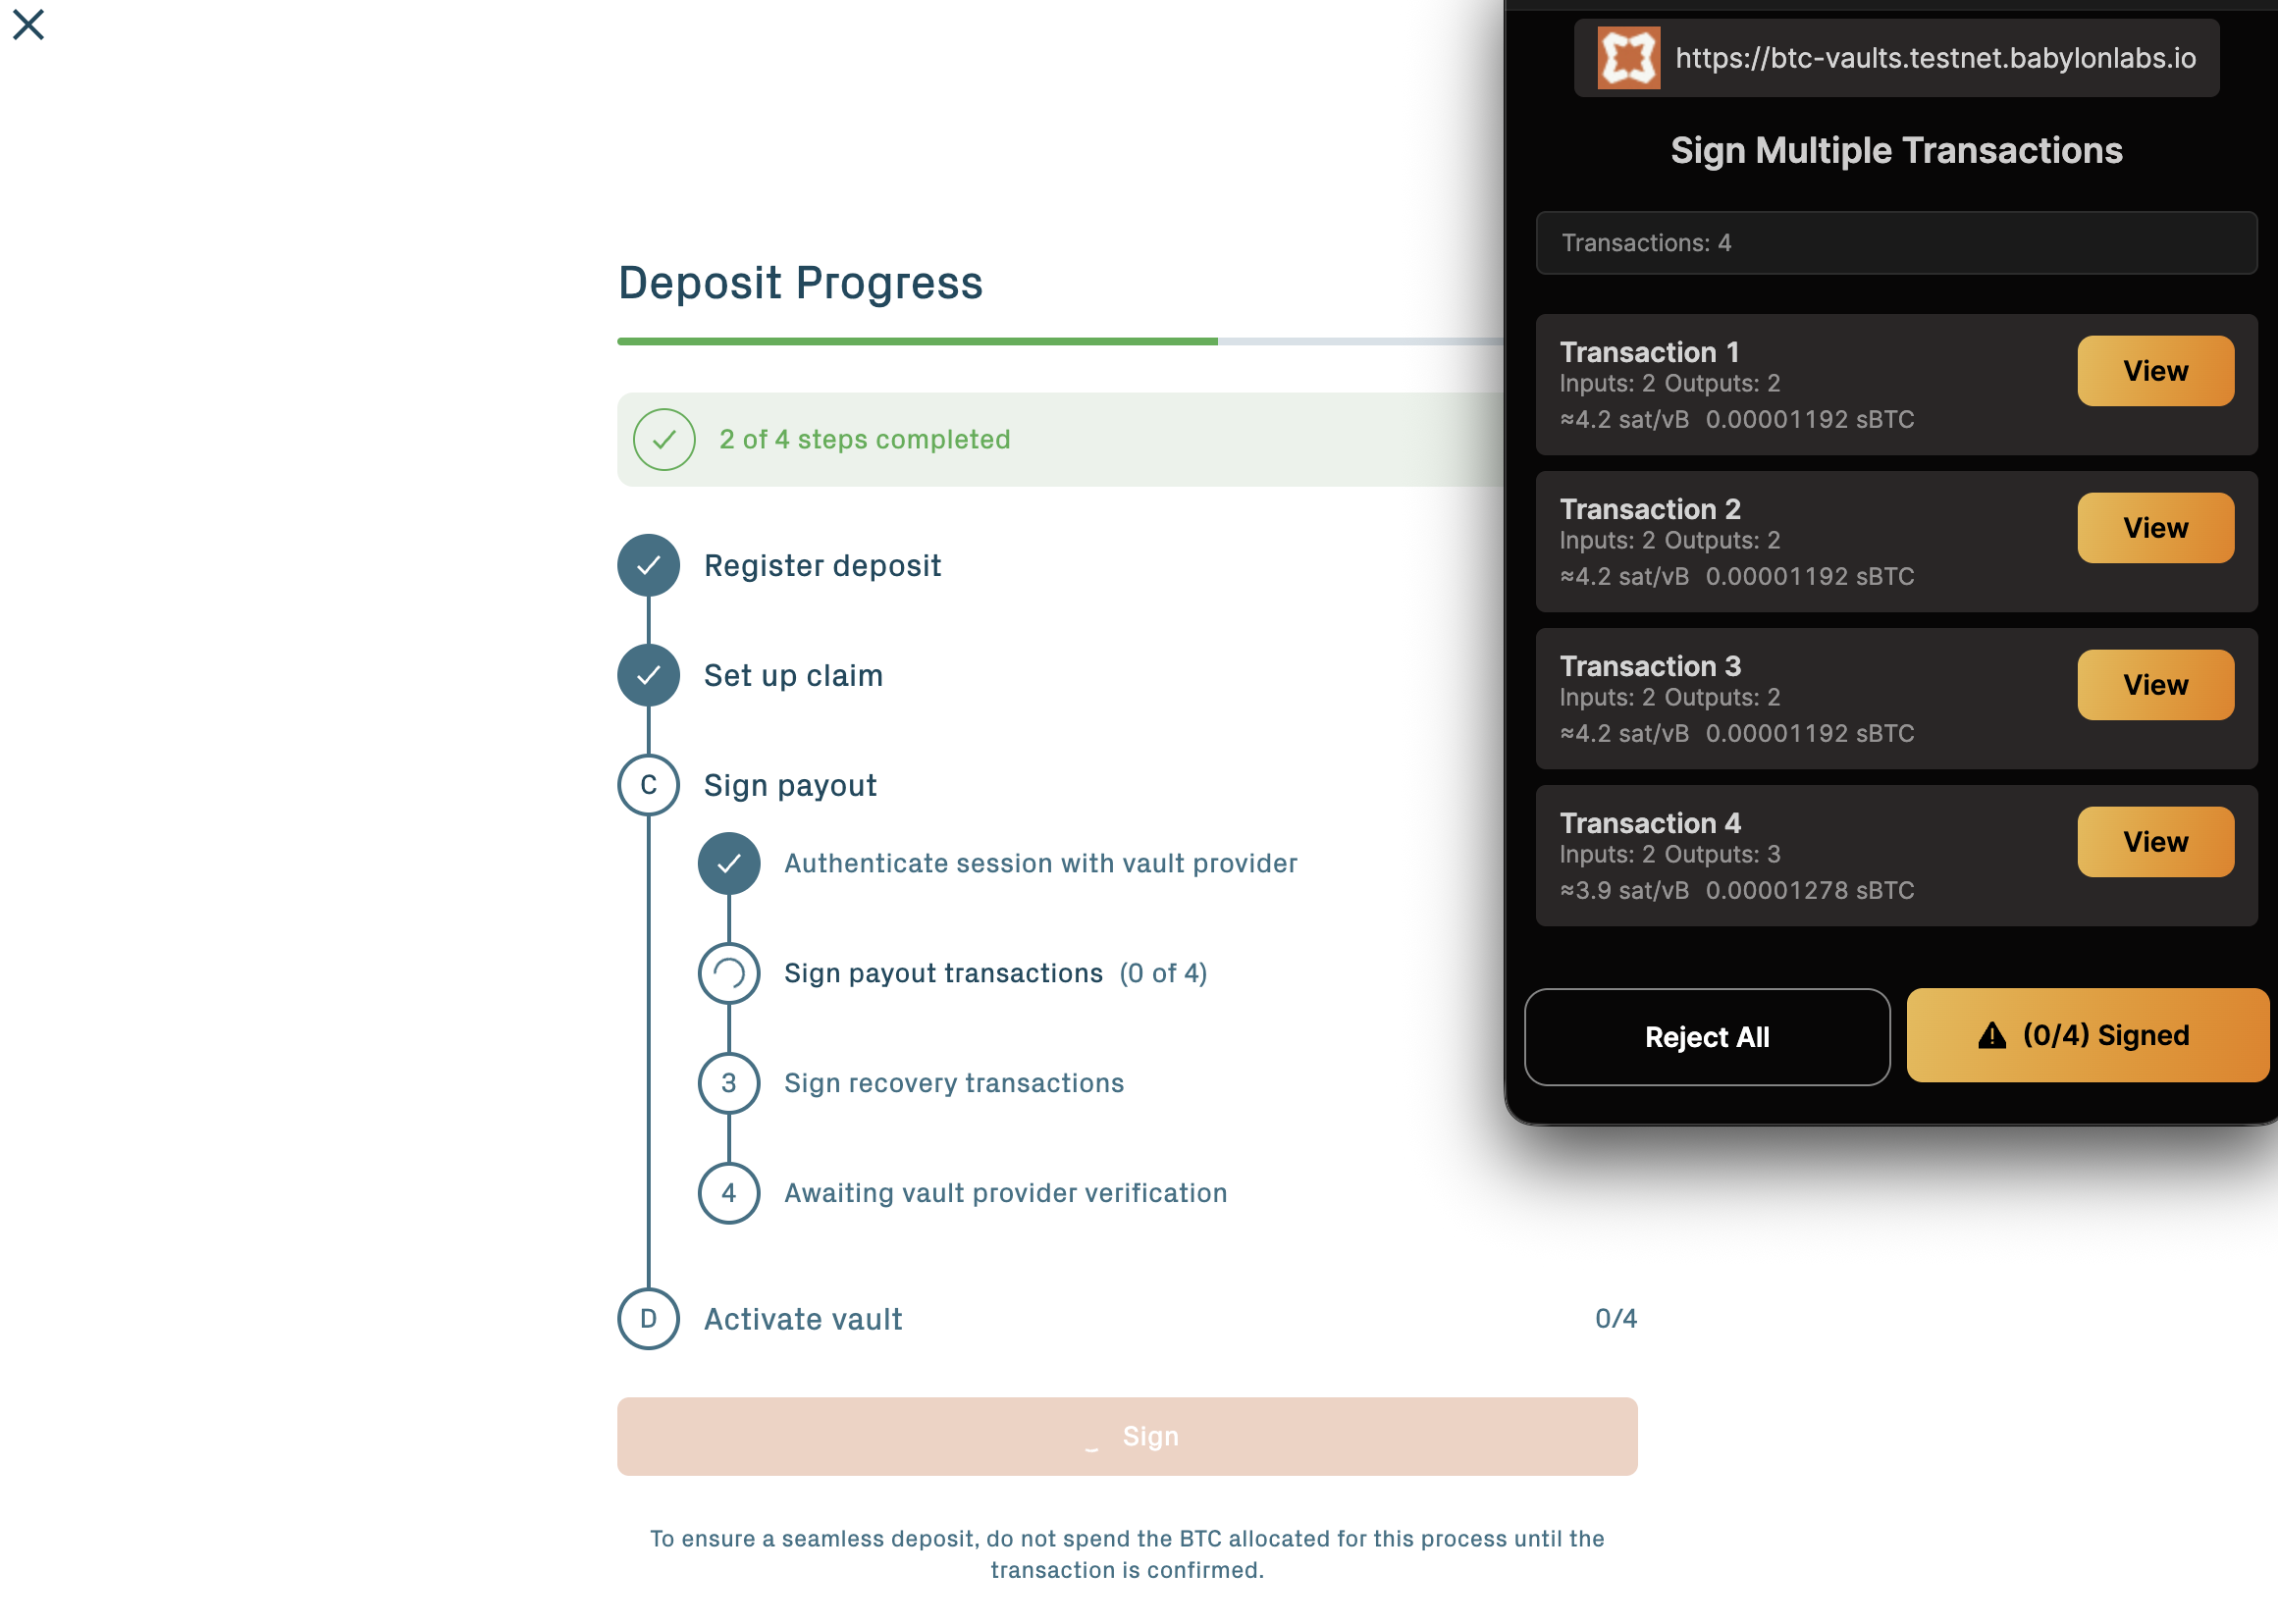
Approve the signing prompts in your Bitcoin wallet.
Together, the Claim graph signatures (Step 5) and the Payout signatures (Step 6) are what give the depositor cryptographic control over which Bitcoin destinations the vault can ever settle to.
Step 7: Download claimer artifacts
When signing completes, the portal offers a Download Claimer Artifacts action. This bundle contains the BABE garbled circuit instances, your WOTS keypair, and the transaction graph data needed for the depositor self-claim path — the fallback that lets you broadcast the Bitcoin claim yourself if the Vault Provider becomes unresponsive during redemption.
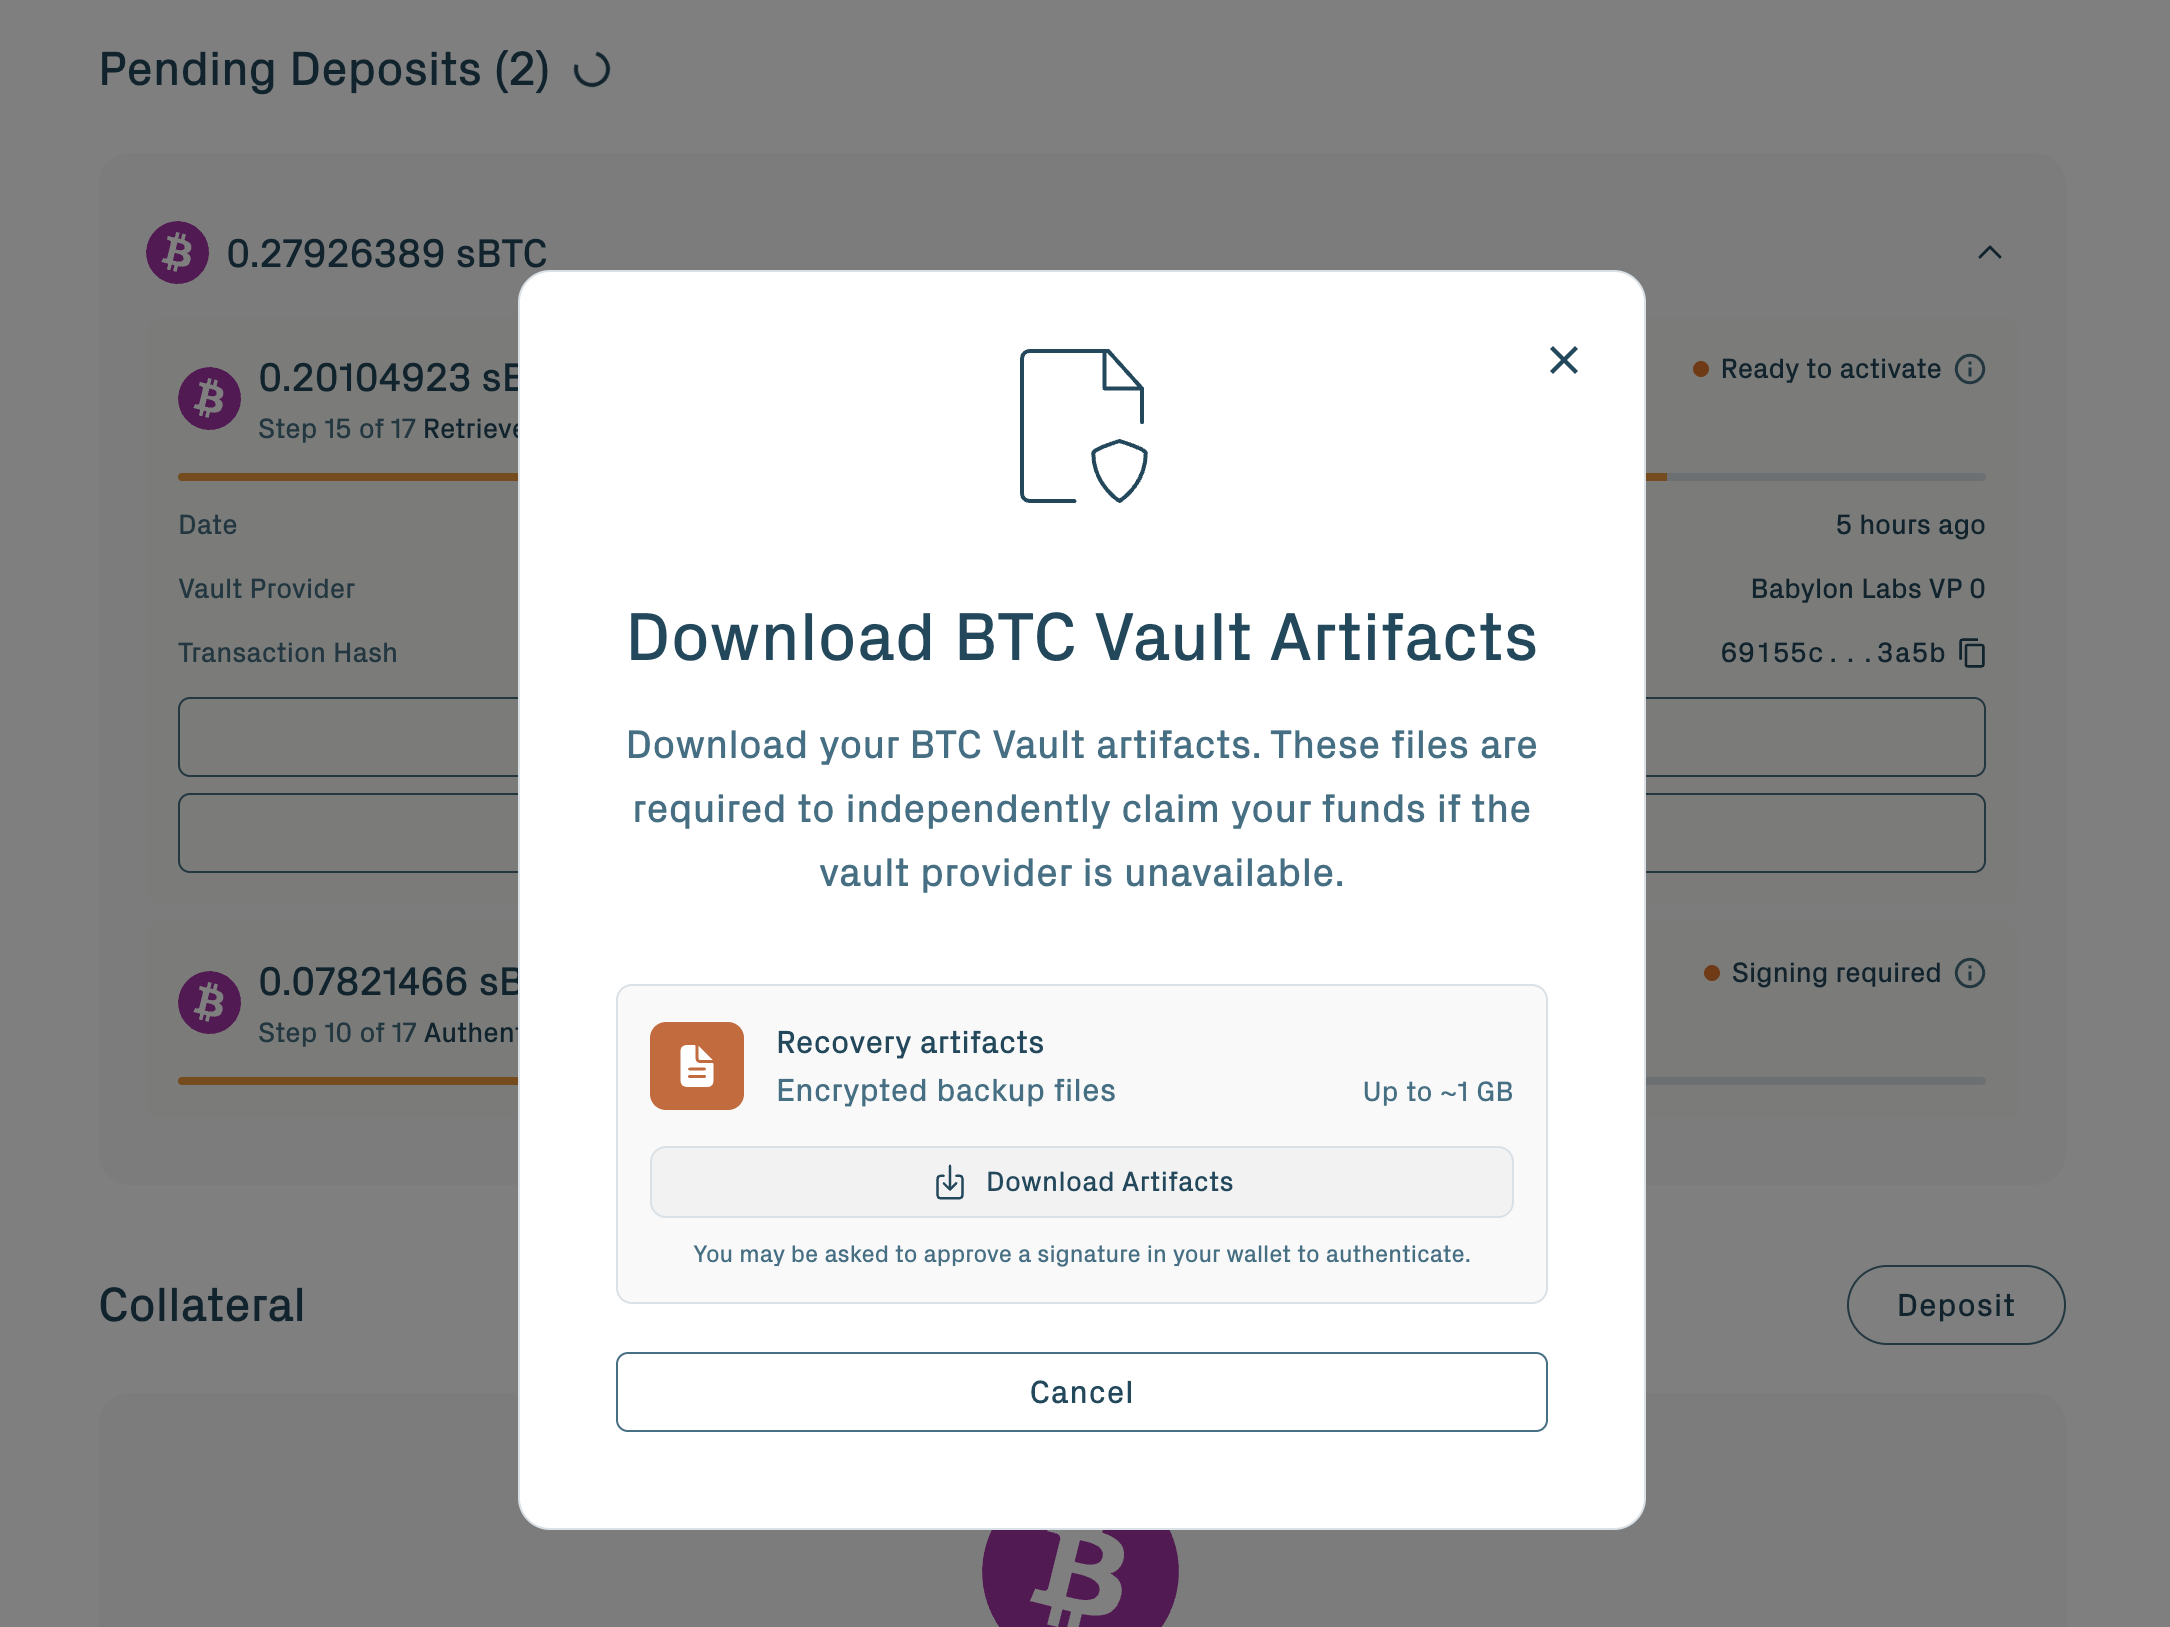
Without the claimer artifacts plus the WOTS keypair file, the self-claim fallback is unavailable for this vault. If you also lose access to the Vault Provider, recovery would require Security Council intervention. The bundle is per-vault; cold storage is acceptable.
Once the artifacts are saved, the off-chain setup completes and the vault transitions to Verified.
See Withdraw & redeem → The self-claim path for how these artifacts are used at peg-out if you ever need the fallback.
Step 8: Activate the vault
When the vault reaches Verified, the portal prompts you to Activate. Click it and confirm the Ethereum transaction.
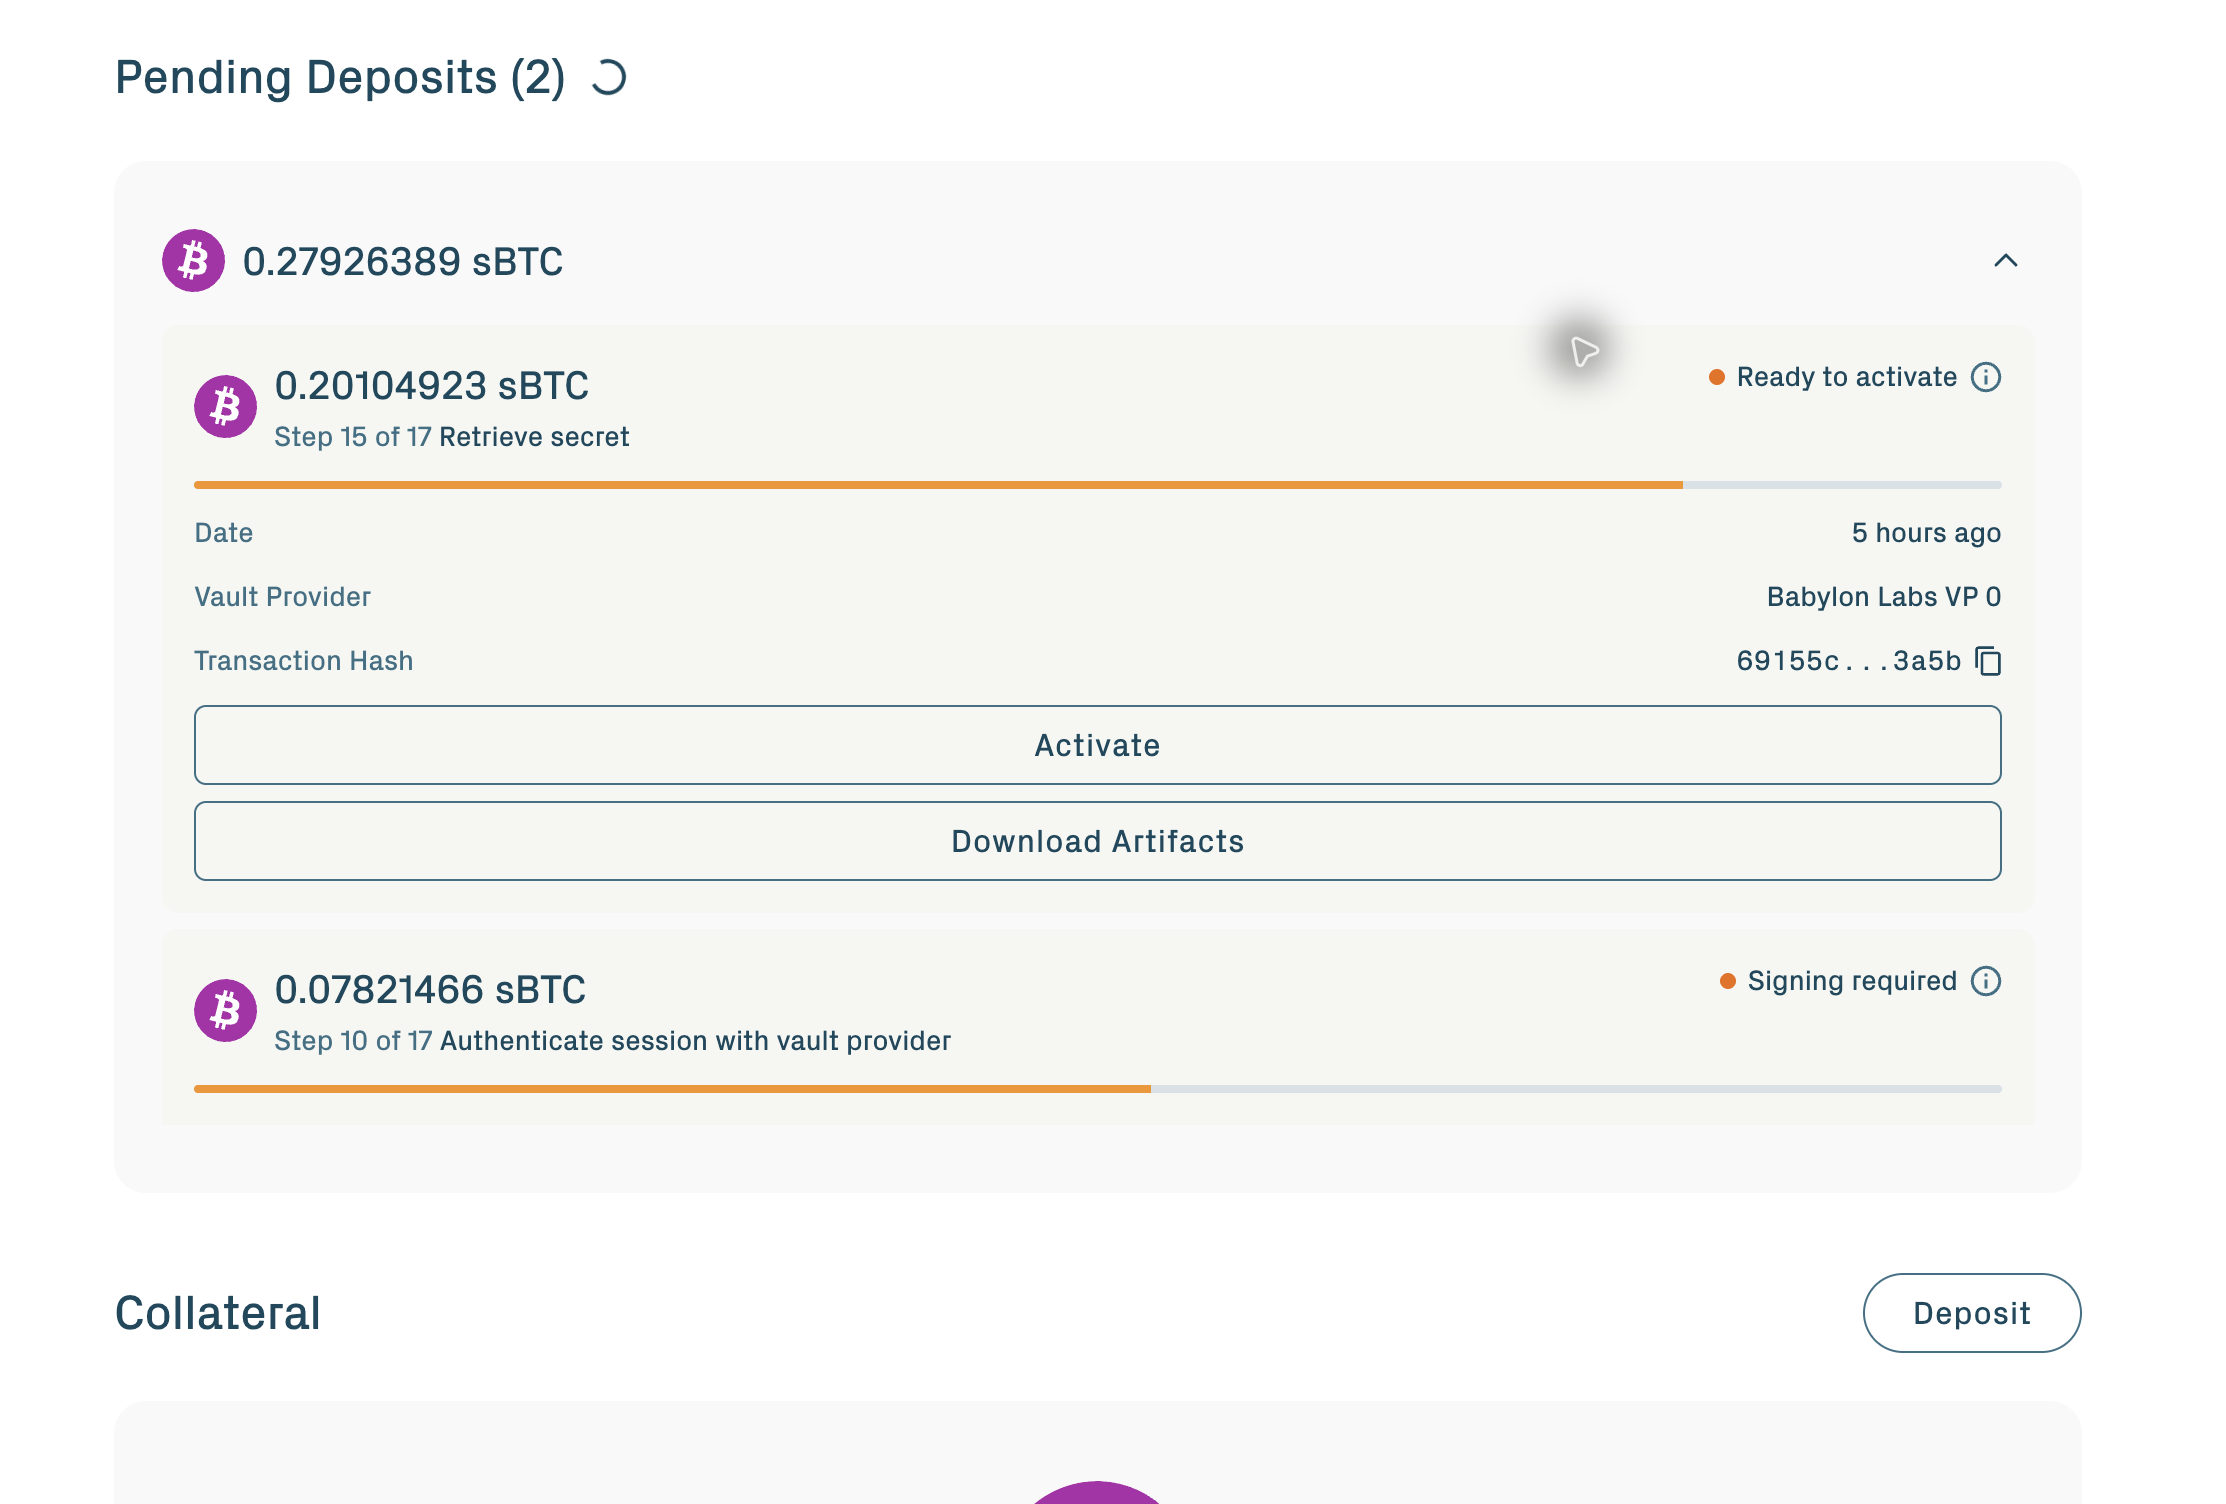
Activation submits the peg-in secret to Ethereum. The contract verifies that the secret's SHA-256 hash matches the original hashlock, then transitions the vault to Active. This emits an event the Vault Provider and Application Vault Keepers detect. They construct the final Bitcoin transaction witness using the secret along with the pre-signed signatures, and broadcast the PegIn transaction. The PegIn transaction spends the Pre-PegIn output and locks the bitcoin inside the BTC Vault Taproot output.
After the PegIn transaction confirms on Bitcoin, the vault is fully active. The BTC is locked in a Bitcoin script whose only spend paths are the ones agreed at creation.
Activate within the 48-hour activation window. The window starts when you submit the peg-in request. If the vault is not activated before pegInActivationTimeout closes, the vault enters Expired state and BTC recovery moves to the refund path.
Step 9: Post activation
vaultBTC for the vault's BTC amount is automatically minted and supplied to your position on the Babylon Core Spoke (the Aave v4 market for vaultBTC) at activation. The manual action is the Activate transaction above; there is no separate mint or supply step. The vault's status moves to InUse; you can now borrow stablecoins or WBTC against it.
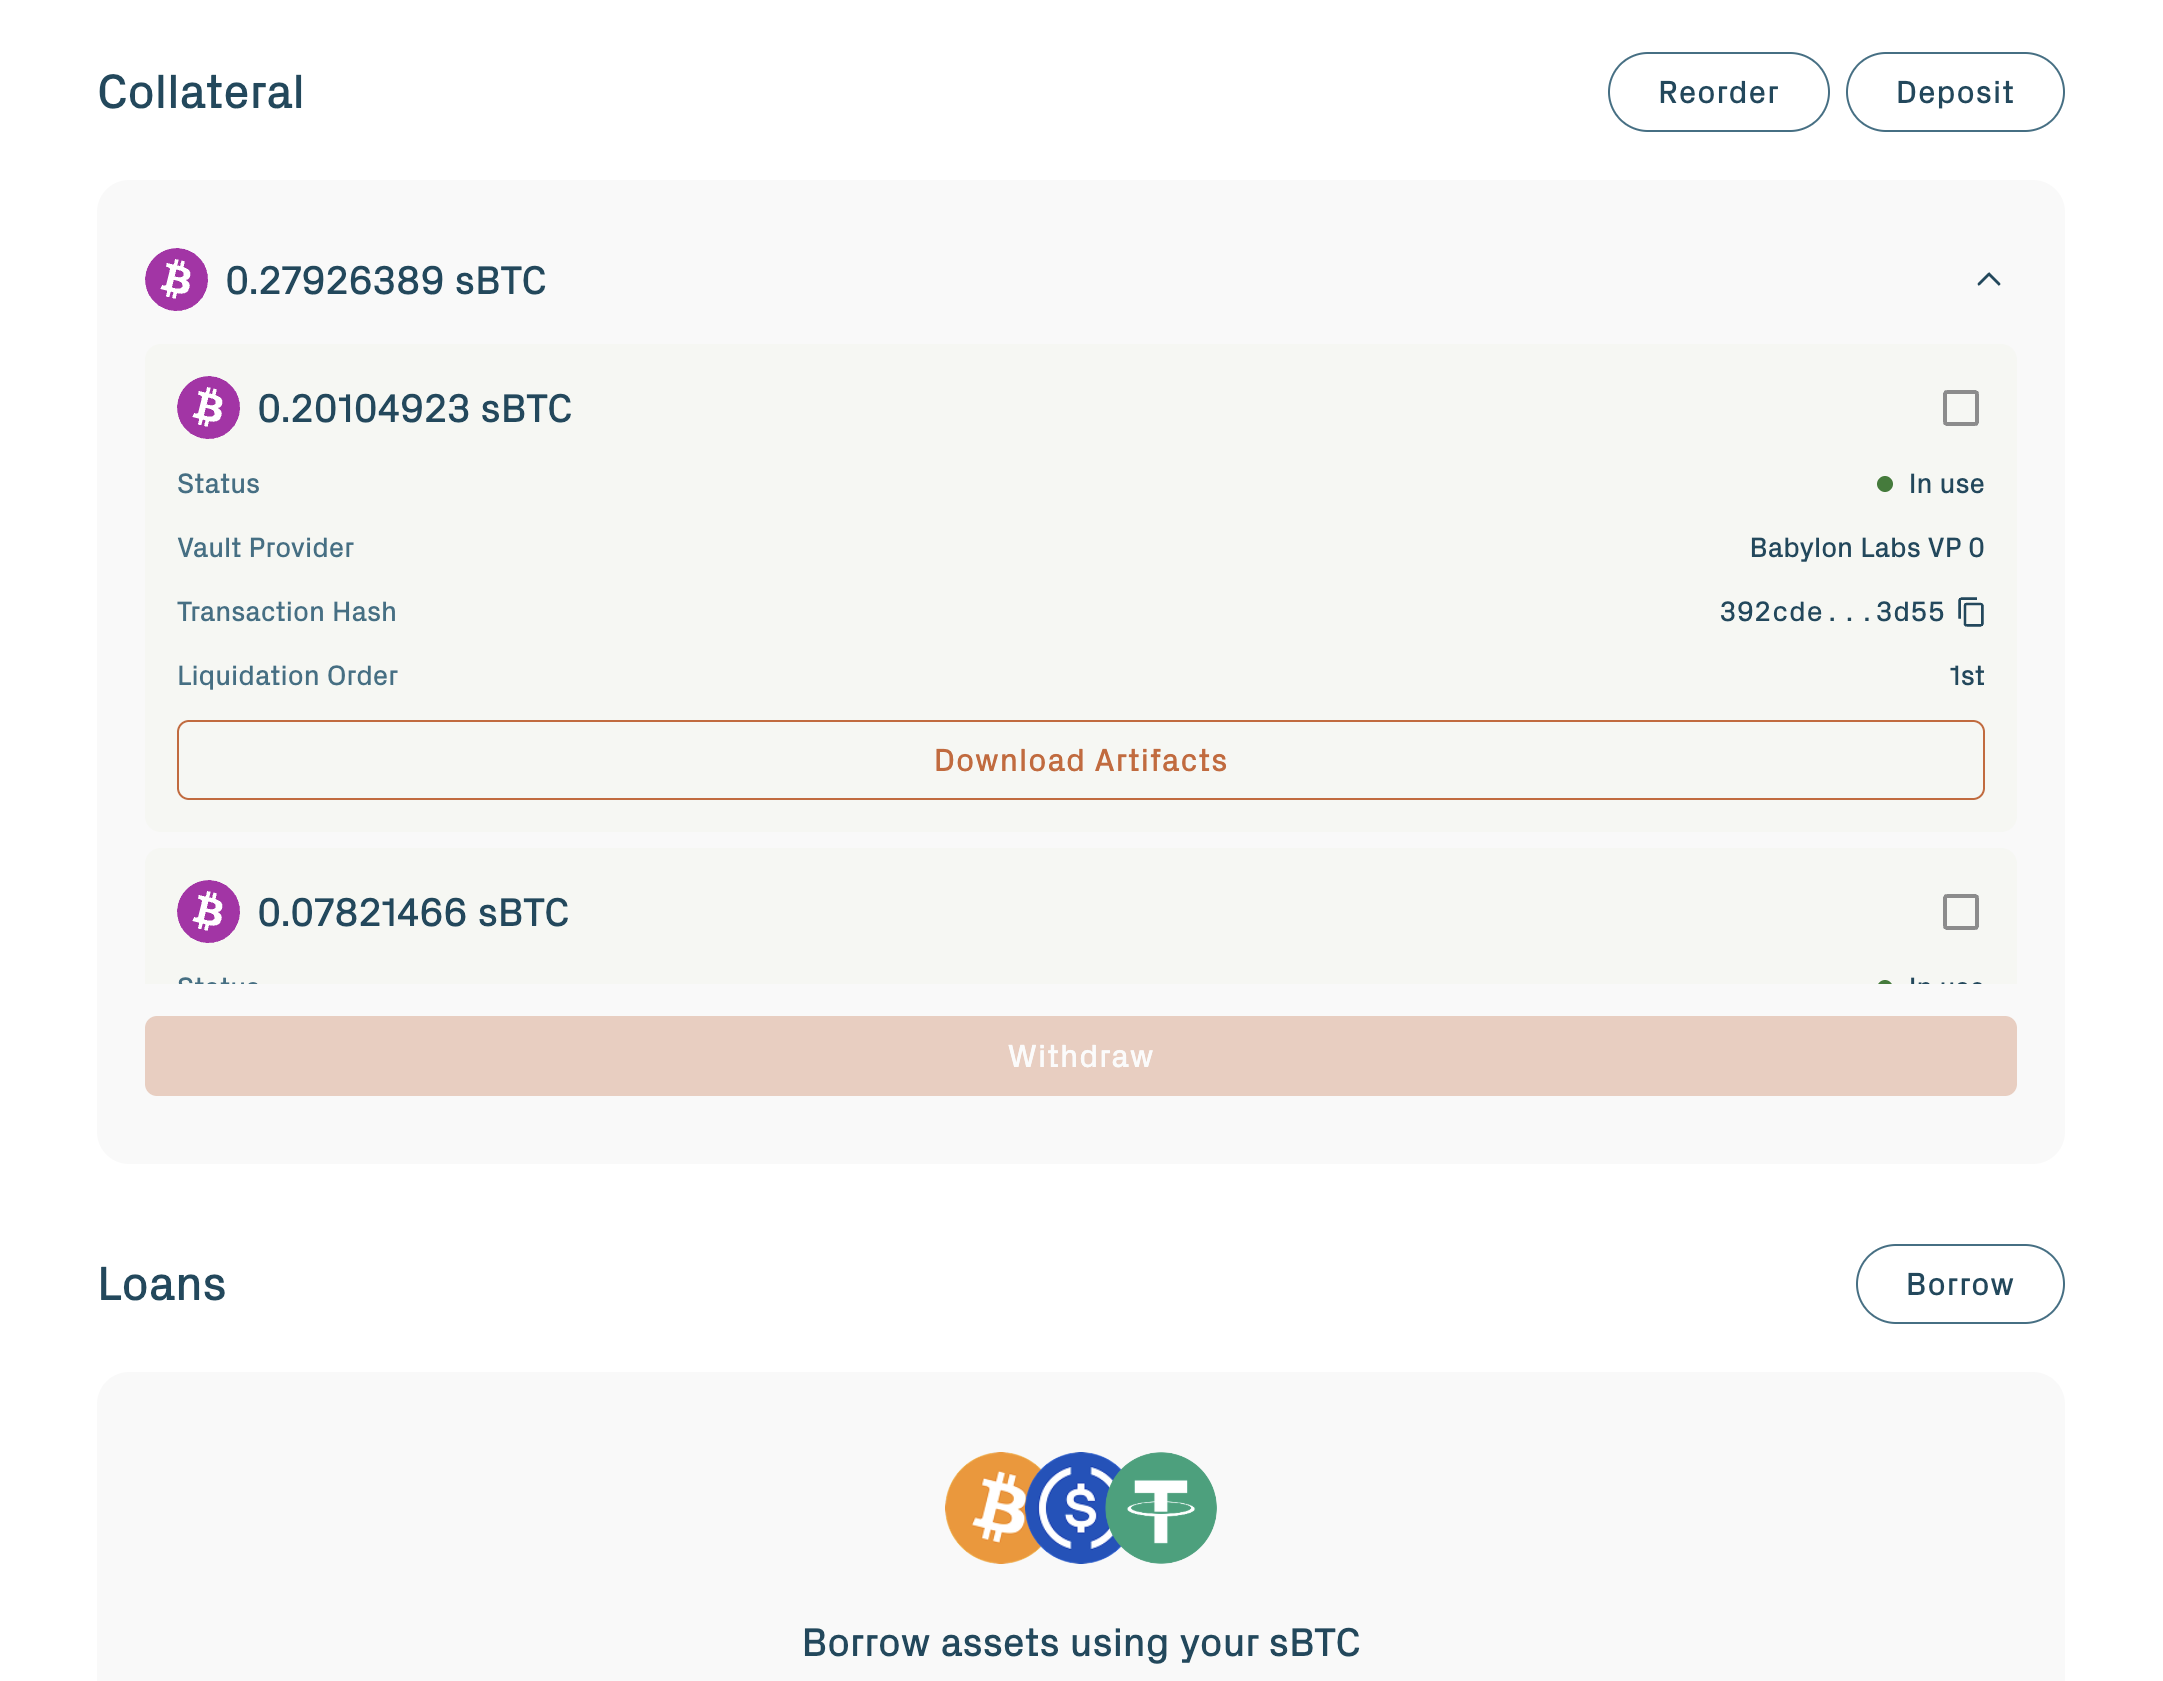
Combine with other vaults. Subsequent vault activations append to the same borrowing position automatically. Position-level limits apply; see Protocol parameters for the current caps.
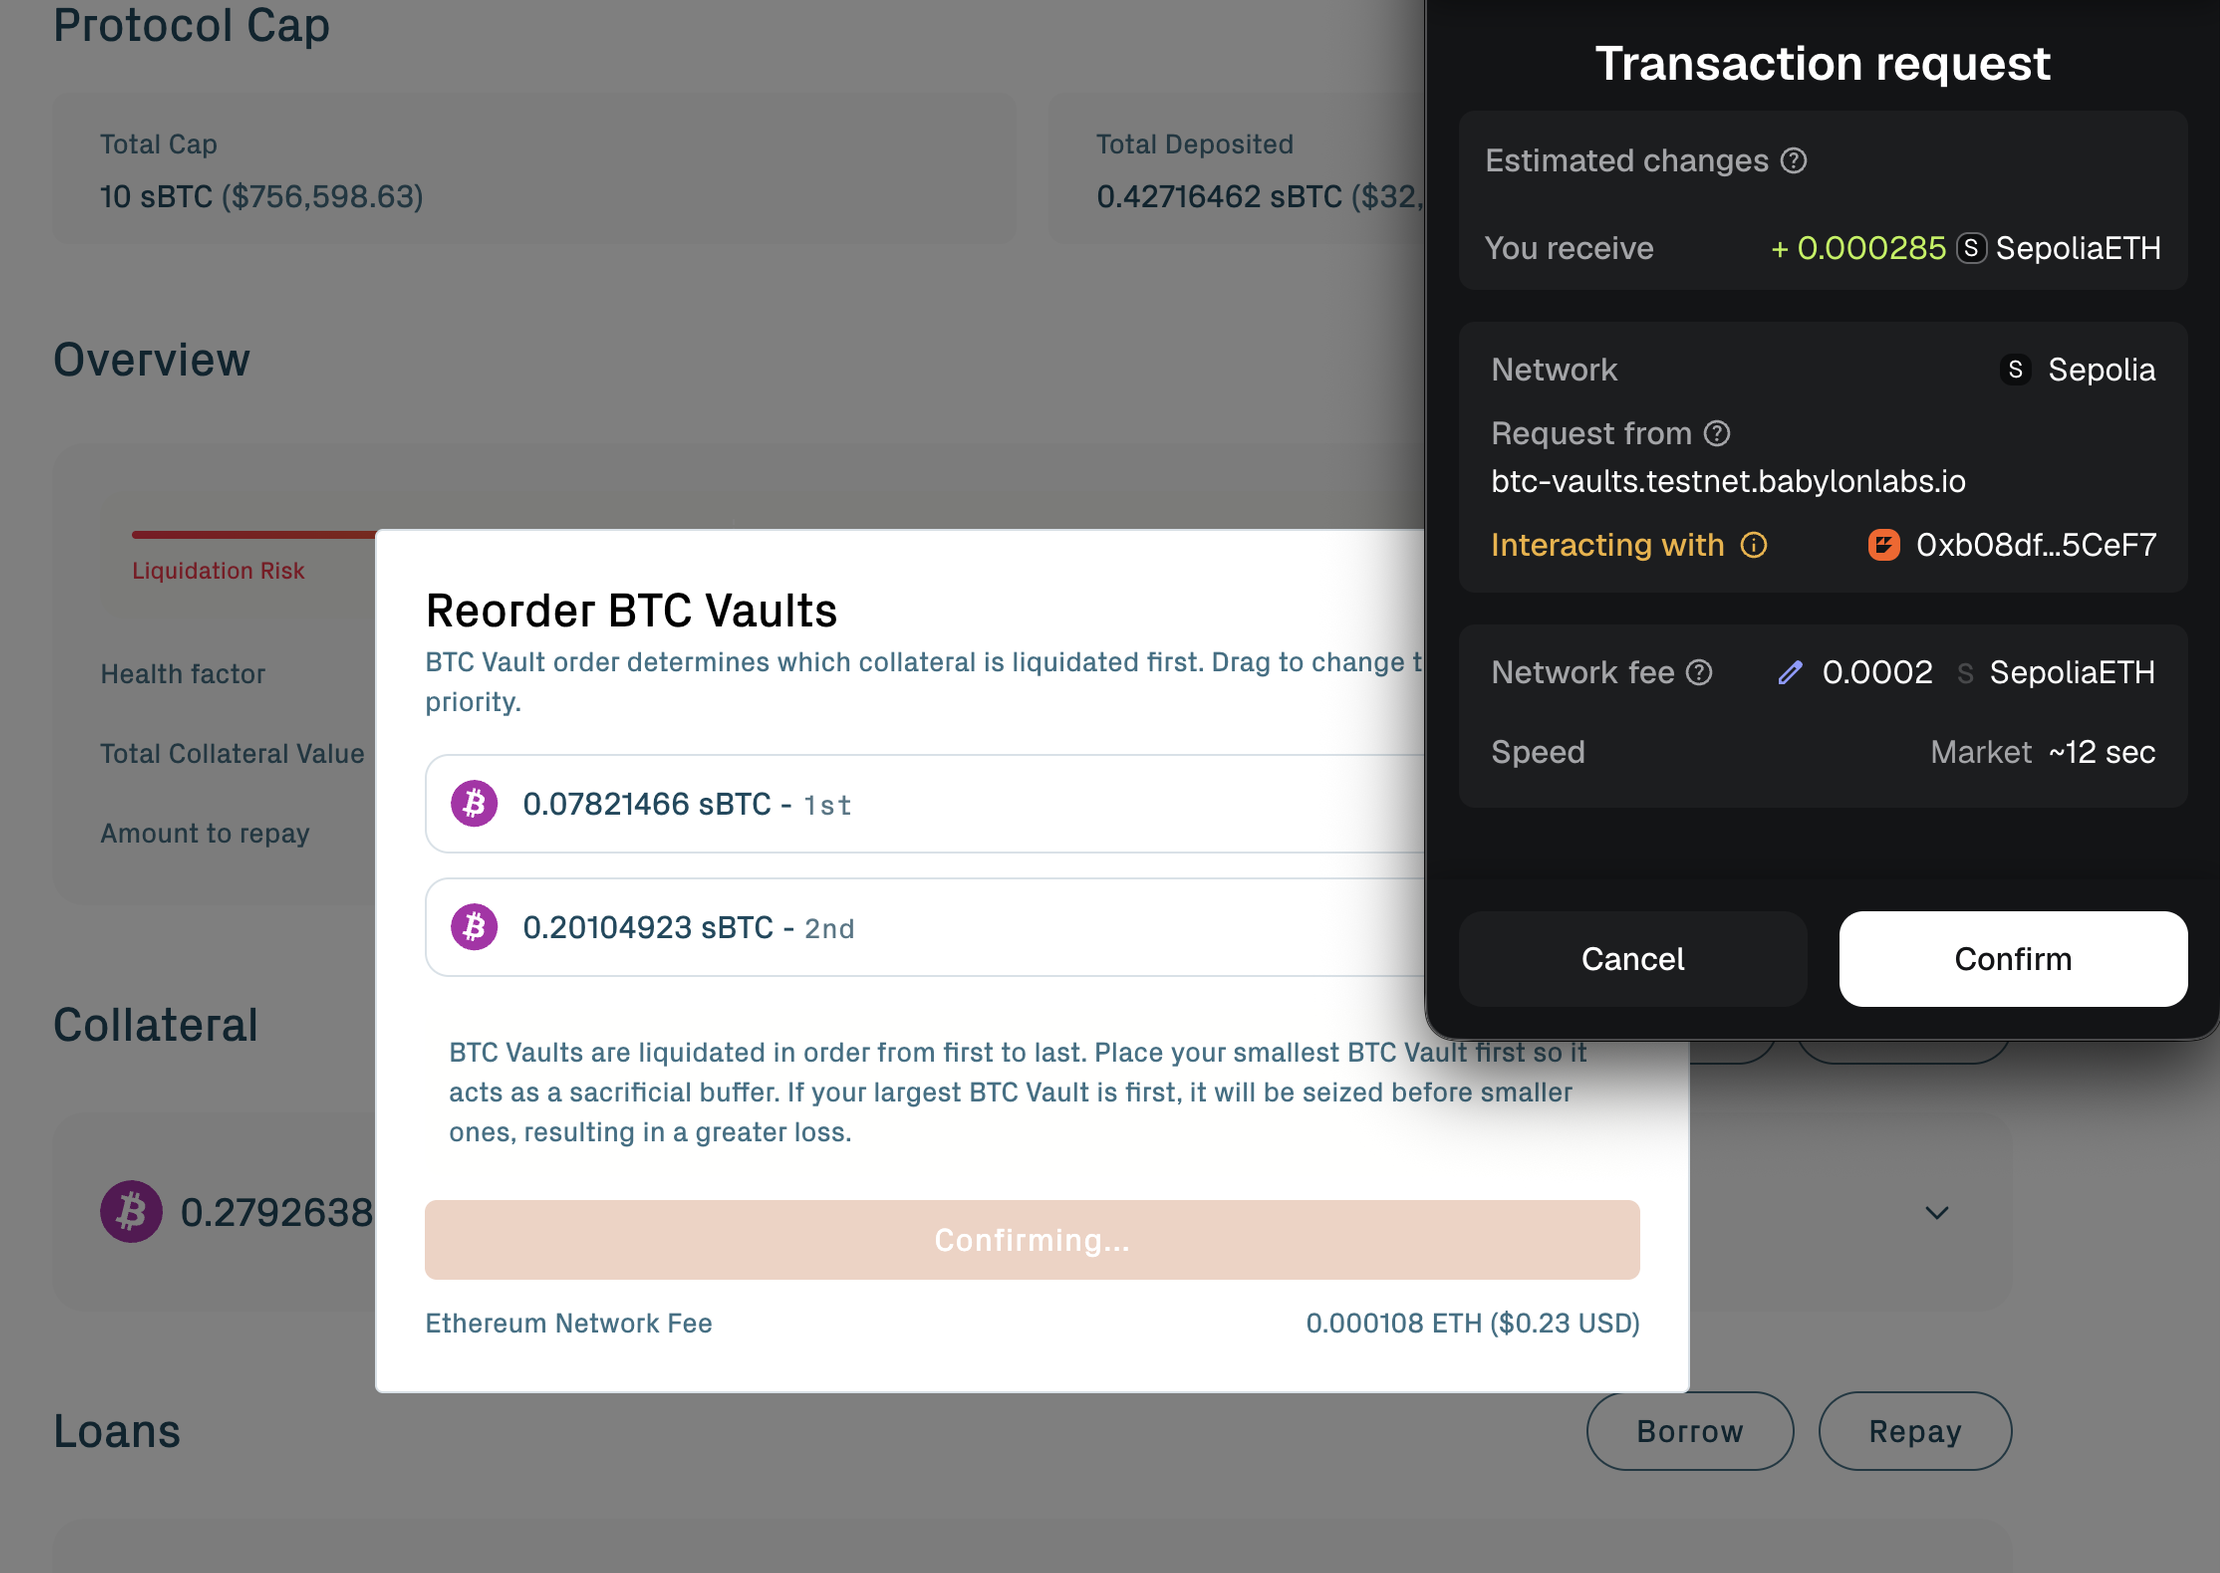
Reorder vaults later
Once vaults are part of a position, the order of the list controls which vault is seized first during a liquidation. You can reorder vaults from the Collateral section at any time, as long as no liquidation is in progress.
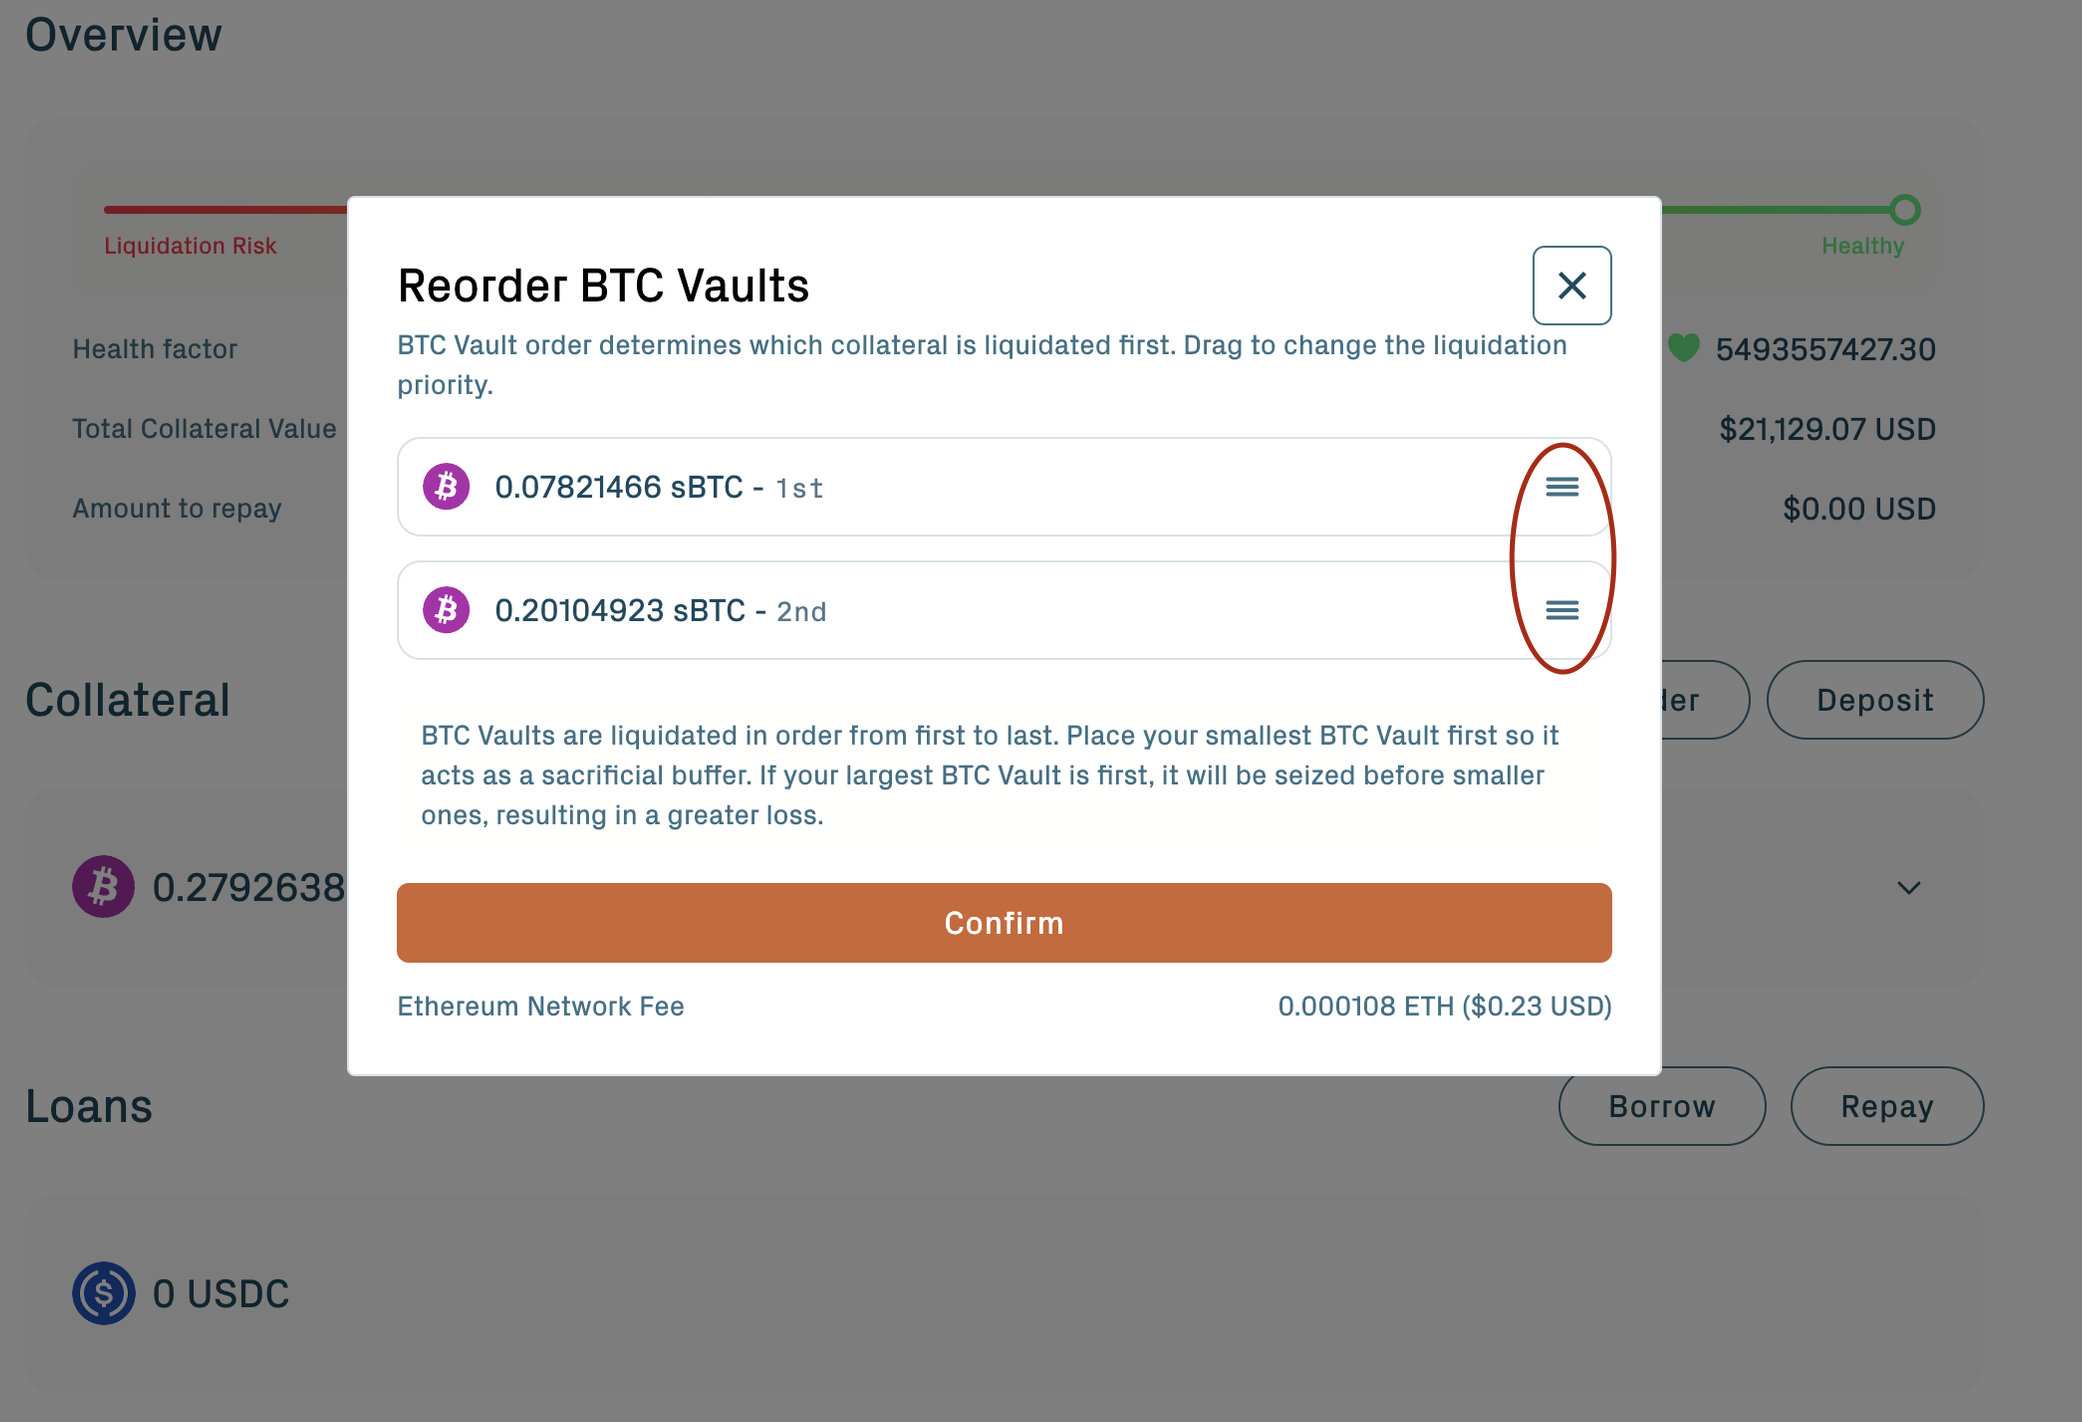
Reordering is useful when:
- You added a third (or more) vault and want to update the seizure priority.
- You partially redeemed the original sacrificial vault and need a new one promoted to the front.
- Governance changes the target health factor and the portal recommends a different split or order.
Vaults in Available status (not added to a position) are not part of any seizure order; ordering only applies once a vault is InUse.
If activation stalls
If the off-chain setup fails to complete, or you change your mind before activating, you can recover your BTC via the refund path on the Pre-PegIn transaction.
The refund path is a Taproot leaf locked behind a Bitcoin timelock (tRefund = 3 days on the current Testnet). The timelock is set such that the refund window opens only after the protocol's normal activation window has closed. Once the timelock elapses, sign with your Bitcoin key and broadcast a refund transaction that returns the Pre-PegIn output to your wallet.
The refund is unilateral. It does not require cooperation from the Vault Provider, the Application Vault Keepers, or any other participant. As long as you control the original Bitcoin signing key, the BTC is recoverable.
Two distinct failure modes both lead to refund:
- Setup didn't complete (vault expires by
pegInAckTimeout≈ 24 hours): the peg-in fee is refunded automatically, and the BTC is recoverable via the refund path aftertRefundelapses. - You didn't activate (vault expires by
pegInActivationTimeout≈ 48 hours after creation, despite reaching Verified): the peg-in fee is non-refundable, but the BTC remains recoverable via the refund path.
Timeline summary
| Stage | Duration (Testnet, signet) |
|---|---|
| Pre-PegIn submission and Bitcoin confirmations | ~120 minutes (12 signet blocks) |
| Off-chain setup (signing, ACK collection) | 6 to 10 minutes (concurrent with confirmations) |
| Activation | A few seconds plus 1 Ethereum block |
| PegIn broadcast on Bitcoin | ~10 minutes |
| Total | ~2 hours from Deposit to Active |
Next steps
- Borrow & repay: borrow USDC, USDT, or WBTC against your activated vault.
- Liquidation risk: health factor mechanics, what happens during a seizure, and how the two-vault split protects you.
- Withdraw & redeem: releasing the underlying BTC back to your Bitcoin wallet.